Getting Started
Using Mappedin JS with your own map requires a Pro license. Try a demo map for free or refer to the Pricing page for more information.
This getting started guide demonstrates how to start a project using Mappedin JS. Following this guide results in a working demo with a map that you can interact with (zoom, pan, rotate etc).
Mappedin JS v6 is available as @mappedin/mappedin-js in NPM.
Video Walkthrough
Coding with AI
Mappedin JS provides an https://developer.mappedin.com/llms-mappedin-js.txt file with developer guides and https://docs.mappedin.com/web/v6/latest/llms.txt with API reference that can be used to help with coding when using Large Language Models (LLMs).
Expand for instructions on how to use Mappedin provided llms.txt files with Cursor, Github Copilot, JetBrains AI Assistant and Windsurf.
How to use llms.txt files with LLMs:
- Cursor
- Github Copilot
- JetBrains AI Assistant
- Windsurf
To use the llms.txt file with Cursor:
- Download the
llms.txtfiles linked in this guide above. - Create a
.cursordirectory in your project root if it doesn't exist already. - Place the
llms.txtfile in the.cursordirectory. - Start creating a new Cursor rule using Cursor's instructions.
- Set the rule type to:
Apply Intelligently. - Set the agent description to:
Use this rule whenever a question is asked about Mappedin, Mappedin-JS, Mappedin SDK.. - In the rule body, add:
1. Add a reference to the developer guide llms.txt file as an mdc link:[llms-mappedin-js.txt](mdc:.cursor/llms-mappedin-js.txt)
2. Add a reference to the API reference llms.txt file:[llms.txt](mdc:.cursor/llms.txt) - Optionally, if using Mappedin JS, add an mdc reference to the Mappedin JS TypeScript definitions:
[@mappedin/mappedin-js TypeScript definitions](mdc:node_modules/@mappedin/mappedin-js/lib/esm/index.d.ts) - The full rule text should look like this:
--- description: Use this rule whenever a question is asked about Mappedin, Mappedin-JS, Mappedin SDK. alwaysApply: false --- [llms-mappedin-js.txt](mdc:.cursor/llms-mappedin-js.txt) [llms-mappedin-js.txt](mdc:.cursor/llms-mappedin-js.txt) [@mappedin/mappedin-js TypeScript definitions](mdc:node_modules/@mappedin/mappedin-js/lib/esm/index.d.ts) - With this configuration, Cursor will automatically use the
llms.txtwhenever a question is asked aboutMappedin,Mappedin-JSorMappedin SDKs. When starting a new chat be sure to mentionMappedinto trigger the rule. - The
llms.txtfile includes:- Detailed explanations of concepts
- Code examples and their context
- Related documentation references
- Source file locations for verification
This configuration ensures that Cursor provides assistance aligned with Mappedin documentation and best practices, using the same structured information found on the Mappedin Developer Portal.
To use the llms.txt file with GitHub Copilot Chat in VS Code:
- Download the
llms.txtfiles linked in this guide above. - Create a
.copilotdirectory in your project root if it doesn't exist already. - Place the developer guide
llms-mappedin-js.txtfile as well as the API referencellms.txtfile in the.copilotdirectory. - When using Copilot Chat, you can reference the file by saying "Please use the context from the llms.txt files in the .copilot directory".
- The
llms.txtfile includes:- Detailed explanations of concepts
- Code examples and their context
- Related documentation references
- Source file locations for verification
This helps ensure that Copilot provides assistance that is consistent with documentation and best practices, using the same structured information that's available on the Mappedin Developer Portal.
To use the llms.txt file with JetBrains AI Assistant:
- Download the
llms.txtfiles linked in this guide above. - Create a
.idea/aidirectory in your project root if it doesn't exist already. - Place the developer guide
llms-mappedin-js.txtfile as well as the API referencellms.txtfile in the.idea/aidirectory. - When using the AI Assistant, you can reference the file by saying "Please use the context from the llms.txt file in the .idea/ai directory".
- The
llms.txtfile includes:- Detailed explanations of concepts
- Code examples and their context
- Related documentation references
- Source file locations for verification
This helps ensure that the AI Assistant provides assistance that is consistent with documentation and best practices, using the same structured information that's available on the Mappedin Developer Portal.
To use the llms.txt file with Windsurf in VS Code:
- Download the
llms.txtfiles linked in this guide above. - Create a
.windsurfdirectory in your project root if it doesn't exist already. - Place the developer guide
llms-mappedin-js.txtfile as well as the API referencellms.txtfile in the.windsurfdirectory. - When using Windsurf Chat, you can reference the file by saying "Please use the context from the llms.txt file in the .windsurf directory".
- The
llms.txtfile includes:- Detailed explanations of concepts
- Code examples and their context
- Related documentation references
- Source file locations for verification
This helps ensure that Windsurf provides assistance that is consistent with documentation and best practices, using the same structured information that's available on the Mappedin Developer Portal.
Local Development
For local development, clone the Mappedin JS v6 Quickstart repository or start a project using Vite. Refer to the Vite Getting Started guide for setup details. Guides are written in TypeScript (JavaScript), as the SDK is also written in Typescript and uses comprehensive types.
1. Create a Project
Run these shell commands to set up a new project and install Mappedin JS.
yarn create vite mappedin-quickstart
cd mappedin-quickstart
yarn add @mappedin/mappedin-js
2. Update index.html, main.ts
Modify & update the contents of index.html and main.ts to match the following.
<!DOCTYPE html>
<html>
    <head>
        <title>Mappedin JS v6 Getting Started</title>
        <meta charset="UTF-8" />
        <meta name="viewport" content="width=device-width, initial-scale=1.0" charset="UTF-8" />
        <style>
            * {
                margin: 0;
                padding: 0;
            }
            html,
            body {
                width: 100%;
                height: 100%;
            }
            #mappedin-map {
                height: 100%;
                width: 100%;
                position: relative;
            }
        </style>
    </head>
    <body>
        <div id="mappedin-map"></div>
        <script type="module" src="src/main.ts"></script>
    </body>
</html>
Create or update a file under the src directory called main.ts. Write the following contents to the file.
import { getMapData, show3dMap } from '@mappedin/mappedin-js';

// See Demo API key Terms and Conditions
// https://developer.mappedin.com/docs/demo-keys-and-maps
const options = {
    key: 'mik_yeBk0Vf0nNJtpesfu560e07e5',
    secret: 'mis_2g9ST8ZcSFb5R9fPnsvYhrX3RyRwPtDGbMGweCYKEq385431022',
    mapId: '65c0ff7430b94e3fabd5bb8c',
};

async function init() {
    const mapData = await getMapData(options);
    const mapView = await show3dMap(
        document.getElementById('mappedin-map') as HTMLDivElement,
        mapData
    );
}

init();
3. Run the Project
To run the demo (with hotloading), use the following command:
yarn run dev
The following CodeSandbox demonstrates what should be shown.
This should result in a prompt showing the project being served at http://127.0.0.1:5173 (default port). The 3D rendered map can be zoomed, panned and rotated via mouse or fingers.
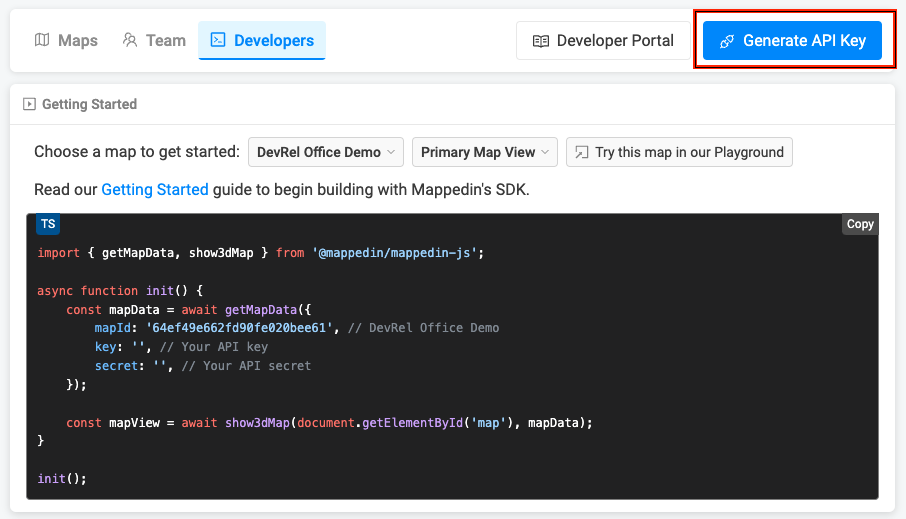
Create a Key & Secret
A key and secret to use Mappedin Demo maps can be found on the Demo Keys & Maps Page. To use your own maps, create your own unique key and secret.
Using maps with your own key and secret requires a Pro or Solutions Map Account.
- Log into the Mappedin Maker.
- Click on the
Developerstab. - Click
Generate API Key. - Enter a name for the key.
- Click
Generate Key. - Store the
keyandsecretis a safe and secure place.

Get a Map Id
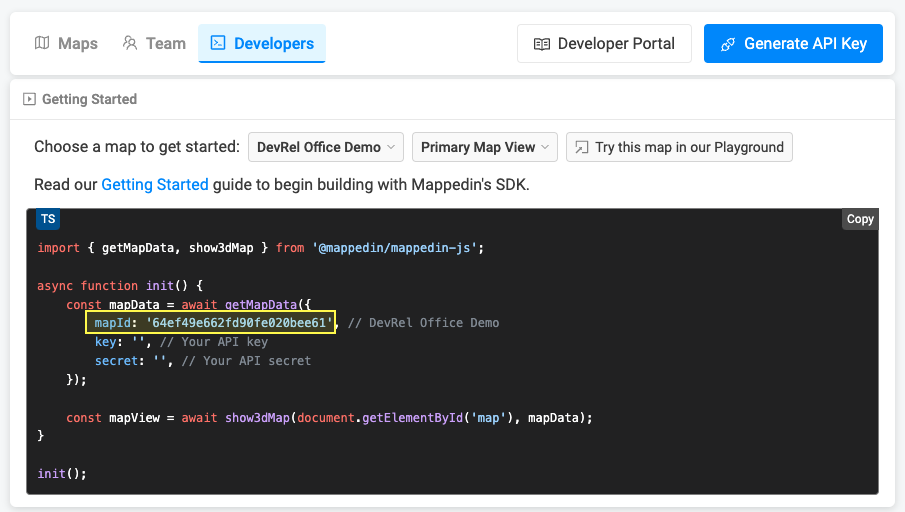
Each map has a unique identifier used by Mappedin JS to load a map. To get the mapId of a map:
- Log into the Mappedin Maker.
- Click on the
Developerstab. - Select the desired map from the dropdown.
- The
mapIdwill be shown in the code snippet.

Not seeing your map?
- Use of Mappedin JS requires a Pro or Enterprise Map Account. Demo API Keys will only work for Mappedin demo maps.
- Remember to set the map to Live. To do so click on the
Share Mapsbutton and changeDrafttoLive.

Authenticating with a Bearer Token
Mappedin JS can also be authenticated with a short lived bearer token. This can be used to prevent exposing an API key and secret by generating a token on the server side. The server can securely store the API key and secret, allowing the client to use the token to authenticate with Mappedin JS.
To do so, make a request to the API Key REST endpoint sending the API key and secret. The following TypeScript example shows how to do this using a fetch request. Additional examples can found in the API Key REST documentation.
async function getAccessToken(): Promise<string> {
    // See Trial API key Terms and Conditions
    // https://developer.mappedin.com/docs/demo-keys-and-maps
    const response = await fetch('https://app.mappedin.com/api/v1/api-key/token', {
        method: 'POST',
        headers: {
            'Content-Type': 'application/json',
        },
        body: JSON.stringify({
            key: 'YOUR_KEY',
            secret: 'YOUR_SECRET',
        }),
    });

    const data: TokenResponse = await response.json();
    return data.access_token;
}
The API Key REST endpoint will return JSON that contains the bearer token.
{
    "access_token": "…",
    "expires_in": 172800
}
The bearer token can then be used to authenticate with Mappedin JS as shown in the following example.
const options = {
  accessToken: 'your-access-token',
  mapId: 'your-map-id',
};
const mapData = await getMapData(options);
const mapView = await show3dMap(document.getElementById('mappedin-map')
	as HTMLDivElement, mapData);
Local Development without NPM
While NPM is highly recommended for version control and to receive the latest bug fixes and features, Mappedin JS may also be imported from a CDN.
In this example JSDelivr will be used to demonstrate importing the mappedin-js package. Mappedin JS is also available on unpkg. Please feel free to reach out if the SDK is not available on a preferred CDN.
Import the SDK stylesheet in the document <head> and any other necessary styles for the app.
<style>
    * {
        margin: 0;
        padding: 0;
    }
    html,
    body {
        width: 100%;
        height: 100%;
    }
    #mappedin-map {
        height: 100%;
        width: 100%;
        position: relative;
    }
</style>
In the <body>, include the element which the map will attach too and the script to asynchronously load the MapView.
<div id="mappedin-map"></div>
<script type="module">
    import {
        getMapData,
        show3dMap,
    } from 'https://cdn.jsdelivr.net/npm/@mappedin/mappedin-js@6.0/lib/esm/index.min.js';

    // See Demo API key Terms and Conditions
    // https://developer.mappedin.com/web/docs/demo-keys-and-maps
    const options = {
        key: 'mik_yeBk0Vf0nNJtpesfu560e07e5',
        secret: 'mis_2g9ST8ZcSFb5R9fPnsvYhrX3RyRwPtDGbMGweCYKEq385431022',
        mapId: '65c0ff7430b94e3fabd5bb8c',
    };

    getMapData(options).then(async mapData => {
        const mapView = await show3dMap(document.getElementById('mappedin-map'), mapData);
    });
</script>
Putting it all together, the entire HTML document should resemble the following.
<!DOCTYPE html>
<html lang="en">
    <head>
        <meta charset="UTF-8" />
        <meta name="viewport" content="width=device-width, initial-scale=1.0" />
        <meta http-equiv="X-UA-Compatible" content="ie=edge" />
        <style>
            * {
                margin: 0;
                padding: 0;
            }
            html,
            body {
                width: 100%;
                height: 100%;
            }
            #mappedin-map {
                height: 100%;
                width: 100%;
                position: relative;
            }
        </style>
        <title>Mappedin JS v6 Getting Started with JSDelivr</title>
    </head>
    <body>
        <div id="mappedin-map"></div>
        <script type="module">
            import {
                getMapData,
                show3dMap,
            } from 'https://cdn.jsdelivr.net/npm/@mappedin/mappedin-js@6.0/lib/esm/index.min.js';

            // See Demo API key Terms and Conditions
            const options = {
                key: 'mik_yeBk0Vf0nNJtpesfu560e07e5',
                secret: 'mis_2g9ST8ZcSFb5R9fPnsvYhrX3RyRwPtDGbMGweCYKEq385431022',
                mapId: '65c0ff7430b94e3fabd5bb8c',
            };

            getMapData(options).then(async mapData => {
                const mapView = await show3dMap(document.getElementById('mappedin-map'), mapData);
            });
        </script>
    </body>
</html>
With only the above document, a map will be rendered into the window. Just like with NPM, the 3D rendered map can be zoomed, panned and rotated via mouse or fingers.
Offline Mode
The examples in the Mappedin JS guides assume that the user is online and connected to the Internet. In some environments, this may not be possible. There are two methods available to store map data offline and use it to render a map.
Offline Loading from TMVF Objects
Offline loading of TMVF objects stored as JSON is appropriate for scenarios where Mappedin JS is used to initially download the map data using the getMapData() function. This data could be stored in a JSON file to be read from when the user is offline. The steps below outline how to do this.
- Load the map using getMapData().
- Use MapData.toJSONBundle() to create a TMVF object.
- Store the TMVF object.
- When the user is offline, read the JSON file and use hydrateMapData() to create a MapData object.
- Use the MapData object to render a map using show3dMap().
The code snippet below demonstrates how to load the map, store the map data in a cache, and then use the cached on subsequent loads.
import { getMapData, hydrateMapData, MapData, show3dMap, THydrateMapDataBundle } from '@mappedin/mappedin-js';
import Dexie, { type EntityTable } from 'dexie';

interface MapDataCache {
	file: THydrateMapDataBundle;
	mapId: string;
}

async function getMapDataFromCache(options: { mapId: string }) {
	try {
		const handle = new Dexie('Mappedin') as Dexie & {
			mapData: EntityTable<MapDataCache, 'mapId'>;
		};

		handle.version(1).stores({
			mapData: '++mapId',
		});

		await handle.open();

		const cached = await handle.mapData.get(options.mapId);

		return cached;
	} catch (e) {
		return null;
	}
}

async function saveMapDataToCache(mapData: MapData, mapId: string) {
	const backup = await mapData.toBinaryBundle();

	if (backup) {
		const db = new Dexie('Mappedin') as Dexie & {
			mapData: EntityTable<MapDataCache, 'mapId'>;
		};

		db.version(1).stores({
			mapData: '++mapId',
		});

		await db.mapData.put({ mapId, file: backup });
	}
}

async function deleteMapDataFromCache(mapId: string) {
	const handle = new Dexie('Mappedin') as Dexie & {
		mapData: EntityTable<MapDataCache, 'mapId'>;
	};

	handle.version(1).stores({
		mapData: '++mapId',
	});

	await handle.open();

	await handle.mapData.delete(mapId);

	console.log('deleted map data from cache');
}

async function init() {
	const options = {
		key: '5eab30aa91b055001a68e996',
		secret: 'RJyRXKcryCMy4erZqqCbuB1NbR66QTGNXVE0x3Pg6oCIlUR1',
		mapId: 'mappedin-demo-mall',
	};

	const cached = await getMapDataFromCache({ mapId: options.mapId });

	let mapData: MapData;
	if (cached && cached.file) {
		console.log('using cached map data');
		mapData = await hydrateMapData(cached.file, options);
	} else {
		console.log('getting map data from server');
		mapData = await getMapData(options);
		await saveMapDataToCache(mapData, options.mapId);
	}

	const mapView = await show3dMap(document.getElementById('mappedin-map') as HTMLDivElement, mapData);
}

init();
Offline Loading from MVF Files
Offline loading of Mappedin Venue Format (MVF) files is appropriate for scenarios where the map data is not fetched using Mappedin JS. This approach is particularly useful in offline or low-connectivity environments—such as air gapped networks, cruise ships, or remote locations. It's also beneficial when you need full control over content distribution, for example, to meet internal security requirements or to ensure that a specific version of the map is always available, regardless of network conditions.
An MVF file can be downloaded from Mappedin Maker or fetched using Mappedin REST API endpoints. Instructions for downloading an MVF file can be found in the Getting Started with MVF v3 guide.
The code snippet below demonstrates how to load a self hosted MVF file.
import { show3dMap, hydrateMapData } from "@mappedin/mappedin-js";
import "./styles.css";

async function init() {
  //Fetch the MVFv3 file hosted in this CodeSandbox.
  const response = await fetch("https://hjsgdv.csb.app/demo-school-mvf-v3.zip");
  const arrayBuffer = await response.arrayBuffer();
  const zipBuffer = new Uint8Array(arrayBuffer);
  const mapData = await hydrateMapData({ type: "binary", main: zipBuffer });

  //Use the parsed MVF to show the map.
  const mapView = await show3dMap(
    document.getElementById("mappedin-map") as HTMLDivElement,
    mapData
  );
}

init();
The code snippet above is implemented in the following CodeSandbox.
Debug Mode
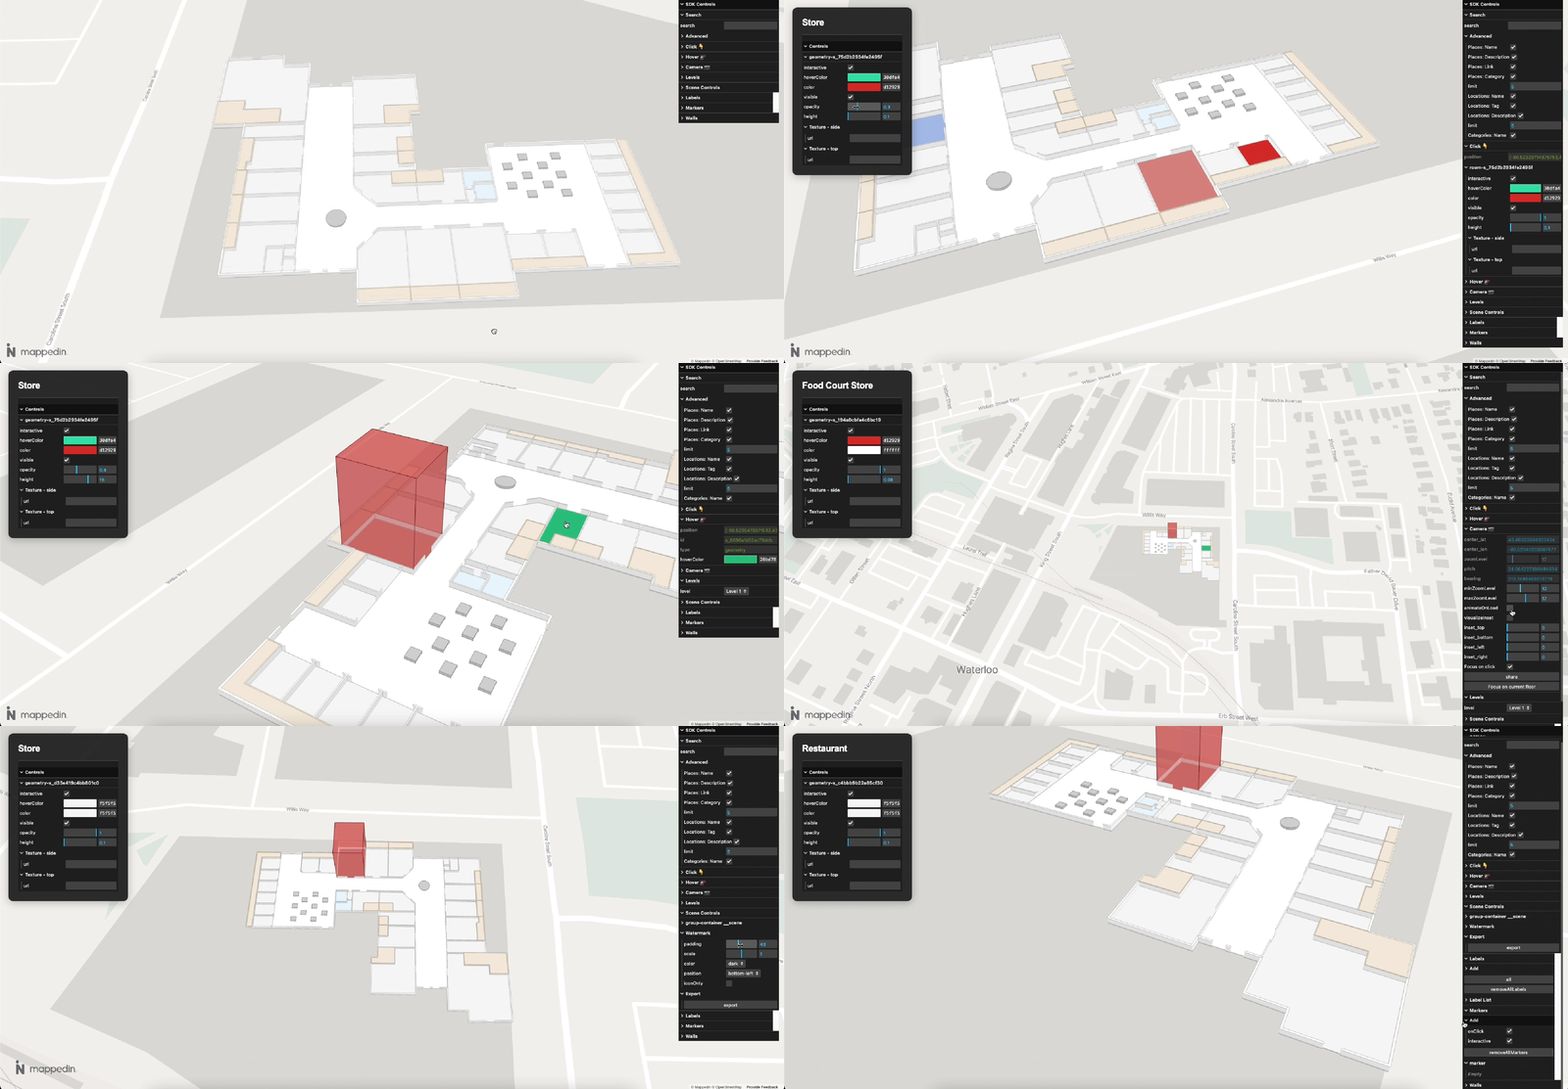
Use Debug Mode to get a closer look at how various map components behave and interact. Here's how to enable it:
1. Enable Debug Mode
To activate the debug interface, call the following function in your code:
mapView.enableDebug();
enableDebug displays a panel on the right side of the map, revealing several tools and controls for direct interaction with the map's elements.
2. Navigating the Debug Panel
The debug panel provides access to a variety of controls:
Geometry Controls
- Adjust individual geometry settings, such as color, opacity, visibility. These controls make it easy to see how different elements respond to changes.
Interactivity
- Use toggles to turn interactivity on/off
- Change colors and hover effects to highlight specific areas
Scene Controls
- Manage the overall scene settings, such as scaling, positioning, and group management. Toggle the visibility of groups or containers within the scene
- Adjust padding, scale, and watermark positioning
- Markers & Labels — Add, remove, or edit markers and labels directly through the panel
Camera Controls
- Fine-tune camera settings, including zoom levels, pitch, and center position
- Set minimum and maximum zoom levels
- Adjust the focus to a specific area or level
