Getting Started
Using Mappedin SDK for Android with your own map requires a Pro license. Try a demo map for free or refer to the Pricing page for more information.
Mappedin SDK for Android helps to deliver the rich indoor mapping experience of a venue, inside Android apps.
The Mappedin SDK for Android is a native interface to Mappedin JS. The SDK is a dependency built using Kotlin, and it automatically handles any authentication, network communication, fetching of map data, its display, and basic user interaction, such as panning, tapping, and zooming. The SDK allows a developer to build their own interactions. Additional layers can be rendered on top of the map.
Mappedin SDK for Android is supported on Android versions 8.0 and above.
Android Studio Project Setup
Add Permissions
Add the following permissions to the AndroidManifest.xml in the application tag.
<uses-permission android:name="android.permission.INTERNET" />
<!--Permissions below are only needed if displaying user location-->
<uses-permission android:name="android.permission.ACCESS_FINE_LOCATION" />
<uses-permission android:name="android.permission.ACCESS_COARSE_LOCATION" />
<uses-permission android:name="android.permission.BLUETOOTH_CONNECT"/>
Ensure that hardware acceleration is not turned off by setting it to true.
<application
    android:hardwareAccelerated="true"
/>
Ensure that the application has a large heap by setting it to true.
<application
    android:largeHeap="true"
/>
Add Application Dependency to Gradle
Add the Mappedin SDK dependency to the application's build.gradle, settings.gradle or libs.versions.toml and sync the changes to download the SDK. The latest version can be found in in Maven Central.
build.gradle or settings.gradle
implementation 'com.mappedin.sdk:mappedin:6.6.0'
libs.versions.toml
[versions]
mappedin = "6.6.0"

[libraries]
mappedin = { module = "com.mappedin.sdk:mappedin", version.ref = "mappedin" }
The Mappedin Android GitHub repository contains a reference project that demonstrates how to use the Mappedin SDK for Android.
Display a Map
The core class of the Mappedin SDK for Android is MapView, which is responsible for instantiating an Android WebView that loads Mappedin JS. MapView is the core class of which all other views and data models can be accessed.
Load Map Data
Call MapView.getMapData to load map data from Mappedin servers. This function must be called first and map data must be loaded before any other Mappedin functions can be called.
// See Trial API key Terms and Conditions
// https://developer.mappedin.com/docs/demo-keys-and-maps
val options =
    GetMapDataWithCredentialsOptions(
        key = "mik_yeBk0Vf0nNJtpesfu560e07e5",
        secret = "mis_2g9ST8ZcSFb5R9fPnsvYhrX3RyRwPtDGbMGweCYKEq385431022",
        mapId = "64ef49e662fd90fe020bee61",
    )

// Load the map data.
mapView.getMapData(options) { result ->
    result.onSuccess {
        Log.d("MappedinDemo", "getMapData success")
    }
}
Show a Map
Call MapView.show3dMap to display the map.
mapView.show3dMap(Show3DMapOptions()) { result ->
    result.onSuccess {
        Log.d("MappedinDemo", "show3dMap success")
    }
}
The following sample code combines the loading of map data and the display of the map and includes a function to be called when the map is ready.
package com.mappedin.demo

import android.os.Bundle
import android.util.Log
import android.view.Gravity
import android.view.ViewGroup
import android.widget.FrameLayout
import android.widget.ProgressBar
import androidx.appcompat.app.AppCompatActivity
import com.mappedin.MapView
import com.mappedin.models.GetMapDataWithCredentialsOptions
import com.mappedin.models.Show3DMapOptions


class DisplayMapDemoActivity : AppCompatActivity() {
	private lateinit var mapView: MapView
	private lateinit var loadingIndicator: ProgressBar

	override fun onCreate(savedInstanceState: Bundle?) {
		super.onCreate(savedInstanceState)
		title = "Display a Map"

		// Create a FrameLayout to hold both the map view and loading indicator
		val container = FrameLayout(this)

		mapView = MapView(this)
		container.addView(
			mapView.view,
			ViewGroup.LayoutParams(
				ViewGroup.LayoutParams.MATCH_PARENT,
				ViewGroup.LayoutParams.MATCH_PARENT,
			),
		)

		// Add loading indicator
		loadingIndicator = ProgressBar(this)
		val loadingParams =
			FrameLayout.LayoutParams(
				ViewGroup.LayoutParams.WRAP_CONTENT,
				ViewGroup.LayoutParams.WRAP_CONTENT,
			)
		loadingParams.gravity = Gravity.CENTER
		container.addView(loadingIndicator, loadingParams)

		setContentView(container)

		// See Trial API key Terms and Conditions
		// https://developer.mappedin.com/docs/demo-keys-and-maps
		val options =
			GetMapDataWithCredentialsOptions(
				key = "mik_yeBk0Vf0nNJtpesfu560e07e5",
				secret = "mis_2g9ST8ZcSFb5R9fPnsvYhrX3RyRwPtDGbMGweCYKEq385431022",
				mapId = "64ef49e662fd90fe020bee61",
			)

		// Load the map data.
		mapView.getMapData(options) { result ->
			result
				.onSuccess {
					Log.d("MappedinDemo", "getMapData success")
					// Display the map.
					mapView.show3dMap(Show3DMapOptions()) { r ->
						r.onSuccess {
							runOnUiThread {
								loadingIndicator.visibility = android.view.View.GONE
							}
							onMapReady(mapView)
						}
						r.onFailure {
							runOnUiThread {
								loadingIndicator.visibility = android.view.View.GONE
							}
							Log.e("MappedinDemo", "show3dMap error: $it")
						}
					}
				}.onFailure {
					Log.e("MappedinDemo", "getMapData error: $it")
				}
		}
	}

	// Place your code to be called when the map is ready here.
	private fun onMapReady(mapView: MapView) {
		Log.d("MappedinDemo", "show3dMap success - Map displayed")
	}
}
Result
The app should display something that looks like this in the Android Emulator:

And zooming in to have a closer look:

Create a Key & Secret
A key and secret to use Mappedin Demo maps can be found on the Demo Keys & Maps Page. To use your own maps, create your own unique key and secret.
Using maps with your own key and secret requires a Pro or Solutions Map Account.
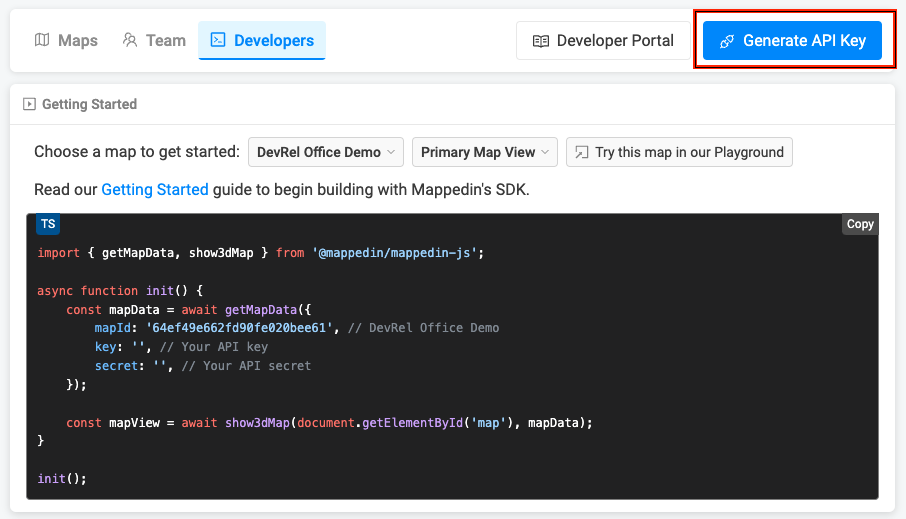
- Log into Mappedin Maker.
- Click on the
Developerstab. - Click
Generate API Key. - Enter a name for the key.
- Click
Generate Key. - Store the
keyandsecretis a safe and secure place.
Get a Map Id
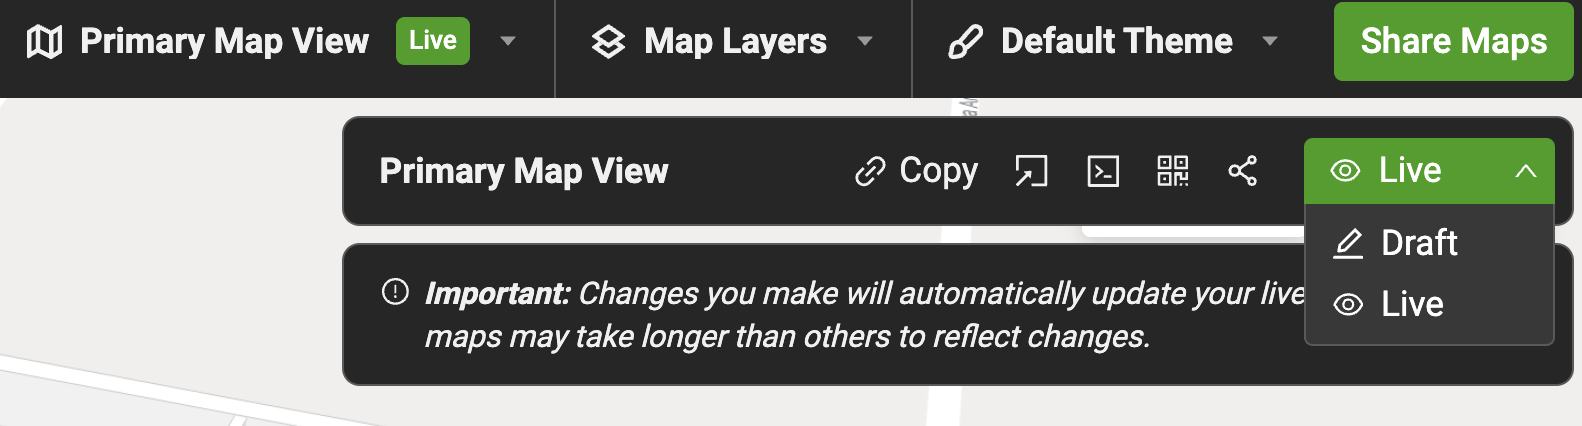
Each map has a unique identifier used by Mappedin JS to load a map. To get the mapId of a map:
- Log into Mappedin Maker.
- Click on the
Developerstab. - Select the desired map from the dropdown.
- The
mapIdwill be shown in the code snippet.

Not seeing your map?
- Remember to set the map to Live. To do so click on the
Share Mapsbutton and changeDrafttoLive. - Integrations require a Pro or Enterprise Map Account. Demo API Keys will only work for Mappedin demo maps.
Caching and Loading Map Data
There are two methods available to cache and reload map data:
- Caching and reloading map data as a Mappedin Venue Format (MVF) file
- Caching and reloading map data as JSON
Whenever possible, it is recommended to cache and load map data as a Mappedin Venue Format (MVF) file because it is more efficient and faster to load than JSON. However, if you need to manipulate the map data before displaying it, you can cache and load it as JSON instead.
Caching and Loading Map Data as a MVF File
A Mappedin Venue Format (MVF) file can be downloaded using Mappedin REST API endpoints. Instructions for downloading an MVF file can be found in the Getting Started with MVF v3 guide. This file can be cached and loaded using the MapView.hydrateMapDataFromURL function. This method accepts a cache URL that can be created using the MapView.getCacheUrl function.
A complete example demonstrating downloading, caching and loading an MVF file can be found in the Mappedin Android GitHub repo: CacheMVFDemoActivity.kt
// Save MVF data to internal storage
val cacheFile = File(filesDir, "cached-mvf-12345.zip")
cacheFile.writeBytes(mvfData)

// Create cache URL using the helper
val mvfUrl = MapView.getCacheUrl("cached-mvf-12345.zip")

// Hydrate map data from URL
mapView.hydrateMapDataFromURL(mvfUrl) { result ->
    result.onSuccess {
        // Map data hydrated, now call show3dMap
    }
}
Caching and Loading Map Data as JSON
Loading map data using MapView.hydrateMapData should not be used for large maps. Use MapView.hydrateMapDataFromURL instead.
JSON representing the map data retrieved from MapView.getMapData can be cached and loaded using the MapView.hydrateMapData function. This method accepts a JSON object that can be created using the MapData.toBinaryBundle function.
A complete example demonstrating caching and loading map data as JSON can be found in the Mappedin Android GitHub repo: CacheMapDataDemoActivity.kt
The code snippet below demonstrates how to cache map data JSON using the MapData.toBinaryBundle function.
private fun saveToCache(mapId: String) {
  mapView.mapData.toBinaryBundle(downloadLanguagePacks = true) { result ->
    result
      .onSuccess { bundle ->
        if (bundle != null) {
          try {
            val cacheFile = getCacheFile(mapId)
            cacheFile.writeBytes(bundle.main)
            Log.d(TAG, "Map data cached successfully to ${cacheFile.absolutePath}")
            Log.d(TAG, "Cache size: ${bundle.main.size} bytes")
            updateStatus("Cached for offline use!")
          } catch (e: Exception) {
            Log.e(TAG, "Failed to save cache: ${e.message}")
          }
        } else {
          Log.w(TAG, "toBinaryBundle returned null")
        }
      }.onFailure { error ->
        Log.e(TAG, "toBinaryBundle error: $error")
      }
  }
}
The code snippet below demonstrates how to load map data JSON from the app's assets using the MapView.hydrateMapData function.
// Read map zip file as bytes
val zipBytes = assets.open("map.zip").readBytes()

// Create backup object with binary data
val mainArray = JSONArray()
for (byte in zipBytes) {
    mainArray.put(byte.toInt() and 0xFF)
}
val backup = JSONObject().apply {
    put("type", "binary")
    put("main", mainArray)
}

// Hydrate map data with credentials
val options = GetMapDataWithCredentialsOptions(
    key = "your-key",
    secret = "your-secret",
    mapId = "your-map-id"
)
mapView.hydrateMapData(backup, options) { result ->
    result.onSuccess {
        // Map data hydrated, now call show3dMap
    }
}
Offline Loading Mode
Offline loading of Mappedin Venue Format (MVF) files is appropriate for scenarios where the map data is not fetched using Mappedin SDKs. This approach is particularly useful in offline or low-connectivity environments—such as air gapped networks, cruise ships, or remote locations. It's also beneficial when you need full control over content distribution, for example, to meet internal security requirements or to ensure that a specific version of the map is always available, regardless of network conditions.
An MVF file can be downloaded from Mappedin Maker or fetched using Mappedin REST API endpoints. Instructions for downloading an MVF file can be found in the Getting Started with MVF v3 guide.
A complete example demonstrating loading an MVF file from the app's assets can be found in the Mappedin Android GitHub repo: OfflineModeDemoActivity.kt
The code snippet below demonstrates how to load an MVF file included in the app.
// Use MapView.getAssetUrl to generate a URL the WebView can fetch
// This is more efficient than reading bytes and passing them through hydrateMapData
val mvfUrl = MapView.getAssetUrl("school-demo-multifloor-mvfv3.zip")

// Hydrate the map data from the local MVF file URL
mapView.hydrateMapDataFromURL(mvfUrl) { result ->
  result
    .onSuccess {
      Log.d("OfflineModeDemo", "hydrateMapDataFromURL success")
      // Display the map
      mapView.show3dMap(Show3DMapOptions()) { r ->
        r.onSuccess {
          runOnUiThread {
            loadingIndicator.visibility = View.GONE
          }
          onMapReady(mapView)
        }
        r.onFailure { error ->
          runOnUiThread {
            loadingIndicator.visibility = View.GONE
          }
          Log.e("OfflineModeDemo", "show3dMap error: $error")
        }
      }
    }.onFailure { error ->
      runOnUiThread {
        loadingIndicator.visibility = View.GONE
      }
      Log.e("OfflineModeDemo", "hydrateMapDataFromURL error: $error")
    }
}
Reusing a MapView Across Screens
MapView renders inside an Android WebView. Each time a new MapView is created, that WebView must boot, download the Mappedin Venue Format (MVF) data, and render the map again. When several screens, such as a directory, a map tab, or a location detail screen, each create their own MapView, this initialization cost is paid on every navigation, resulting in a slow experience with repeated loading delays.
The solution is to create a single MapView for the lifetime of a host Activity and physically reparent that one WebView into whichever screen needs it. The WebView boots once and stays warm, so navigating between screens moves the existing map instead of recreating it.
The following sections describe the key parts of this pattern.
A complete example demonstrating how to reuse a single MapView across screens can be found in the Mappedin Android GitHub repo: ReusableMapViewDemoActivity.kt and ReusableMapScreenFragment.kt.
Creating and Loading the Map Once
The host Activity owns the single MapView and loads it exactly once. Each screen is a Fragment that displays the shared map; the map is never created or destroyed inside a screen.
class ReusableMapViewDemoActivity : AppCompatActivity() {
    private lateinit var sharedMapView: MapView

    // True once the map has loaded and rendered for the first time.
    var isMapReady: Boolean = false
        private set

    override fun onCreate(savedInstanceState: Bundle?) {
        super.onCreate(savedInstanceState)

        // Create the single shared map and load it exactly once.
        sharedMapView = MapView(this)
        loadMap()
    }

    private fun loadMap() {
        // See Demo API Key Terms and Conditions
        // https://developer.mappedin.com/docs/demo-keys-and-maps
        val options =
            GetMapDataWithCredentialsOptions(
                key = "mik_yeBk0Vf0nNJtpesfu560e07e5",
                secret = "mis_2g9ST8ZcSFb5R9fPnsvYhrX3RyRwPtDGbMGweCYKEq385431022",
                mapId = "660c0c6e7c0c4fe5b4cc484c",
            )

        sharedMapView.getMapData(options) { dataResult ->
            dataResult.onSuccess {
                sharedMapView.show3dMap(Show3DMapOptions()) { showResult ->
                    showResult.onSuccess {
                        runOnUiThread {
                            isMapReady = true
                        }
                    }
                }
            }
        }
    }
}
Reparenting the Map into Each Screen
The shared map's view is exposed through MapView.view. Moving it between screens is a matter of removing it from its current parent and adding it to the new screen's container. The host Activity exposes helpers to attach and detach the shared view.
// In the host Activity.

// Reparents the shared map's WebView into the given container.
fun attachMapTo(container: ViewGroup) {
    val mapWebView = sharedMapView.view
    (mapWebView.parent as? ViewGroup)?.removeView(mapWebView)
    // Insert at the bottom of the z-order so overlays, such as a loading
    // indicator added to the container, stay visible on top.
    container.addView(
        mapWebView,
        0,
        ViewGroup.LayoutParams(
            ViewGroup.LayoutParams.MATCH_PARENT,
            ViewGroup.LayoutParams.MATCH_PARENT,
        ),
    )
}

// Removes the shared map's WebView from its current parent, if any.
fun detachMap() {
    val mapWebView = sharedMapView.view
    (mapWebView.parent as? ViewGroup)?.removeView(mapWebView)
}
Each screen Fragment attaches the shared map as it becomes visible in onResume and detaches it on the way out in onDestroyView. The map is never destroyed here, leaving it ready for the next screen.
class ReusableMapScreenFragment : Fragment() {
    private lateinit var mapContainer: FrameLayout

    private val host: ReusableMapViewDemoActivity
        get() = requireActivity() as ReusableMapViewDemoActivity

    override fun onResume() {
        super.onResume()
        // Move the single shared map into this screen.
        host.attachMapTo(mapContainer)
    }

    override fun onDestroyView() {
        // Detach the shared map so the next screen can reparent it. Do not
        // destroy it; the host owns the map's lifecycle.
        host.detachMap()
        super.onDestroyView()
    }
}
Focusing the Map Per Screen
Because every screen shares one map, each screen can drive it independently. When a screen takes ownership of the map, it can focus the Camera on a relevant Space, so the shared map presents differently depending on the active screen.
// In the host Activity. Focuses the shared map on the space chosen
// for the given screen index, once the map is ready.
fun focusForScreen(index: Int) {
    if (!isMapReady) {
        return
    }
    spaceForScreen(index)?.let { sharedMapView.camera.focusOn(it) }
}
Cleaning Up
Because the map is shared, it must outlive the individual screens. Destroy it only when the host Activity itself is finished by calling MapView.destroy in onDestroy.
override fun onDestroy() {
    // Tear down the shared map only when the whole demo is finished.
    sharedMapView.destroy()
    super.onDestroy()
}
Debug Mode
Use Debug Mode to get a closer look at how various map components behave and interact. Here's how to enable it:
1. Enable Debug Mode
To activate the debug interface, call the following function in your code:
mapView.enableDebug()
MapView.enableDebug displays a panel on the right side of the map, revealing several tools and controls for direct interaction with the map's elements.
2. Navigating the Debug Panel
The debug panel provides access to a variety of controls:
Geometry Controls
- Adjust individual geometry settings, such as color, opacity, visibility. These controls make it easy to see how different elements respond to changes.
Interactivity
- Use toggles to turn interactivity on/off
- Change colors and hover effects to highlight specific areas
Scene Controls
- Manage the overall scene settings, such as scaling, positioning, and group management. Toggle the visibility of groups or containers within the scene
- Adjust padding, scale, and watermark positioning
- Markers & Labels — Add, remove, or edit markers and labels directly through the panel
Camera Controls
- Fine-tune camera settings, including zoom levels, pitch, and center position
- Set minimum and maximum zoom levels
- Adjust the focus to a specific area or level
