Wayfinding
Mappedin JS version 6 is currently in a beta state while Mappedin perfects new features and APIs. Open the v6 release notes to view the latest changes.
Using Mappedin JS with your own map requires a Pro license. Try a demo map for free or refer to the Pricing page for more information.
Wayfinding is the process of navigating through environments using spatial cues and instructions to efficiently reach a destination. Mappedin JS provides the tools needed to guide users from one location to another. It allows drawing a path between points on the map as well as creation of textual turn-by-turn directions for navigation.
Video Walkthrough
Getting Directions
Directions form the core of wayfinding. Mappedin has path finding capabilities that allow it to generate directions from one target to another. These directions are used for drawing paths and providing the user with textual turn-by-turn directions.
Generate directions by calling MapData.getDirections() and pass in targets for the origin and destination. These targets are wrapped in a TNavigationTarget, which can contain a Space, MapObject, Coordinate, Door, PointOfInterest or Connection.
MapData.getDirections() can accept a single TNavigationTarget or an array of them for the origin and destination. If an array is used, Mappedin JS will choose the targets that are closest to each other. An example of where this could be used is when a user asks for directions to a washroom. There may be many Spaces labelled Washroom. The app can pass all washroom spaces to getDirections and receive directions to the nearest one. An array of destinations is also used when creating multisegment directions, which are directions that include multiple legs.
Directions for some maps may appear jagged or not smooth. This is due to the SDK attempting to find the shortest path through the map's geometry. Directions can be smoothed by setting TGetDirectionsOptions.smoothing to true in the TGetDirectionsOptions passed to MapData.getDirections().
Drawing Navigation
When a user needs to get from point A to point B, drawing a path on the map helps them to navigate to their destination. It can help them to visualize the route they'll need to take, like a good treasure map.
Navigation is a helper class to display wayfinding easily on the map. Functionality of Navigation could be replicated by drawing the paths using Paths and adding well designed tooltips at connection points.
Note that the MapView class includes the Navigation class and exposes it as MapView.Navigation. Use MapView.Navigation to utilize Navigation's methods.
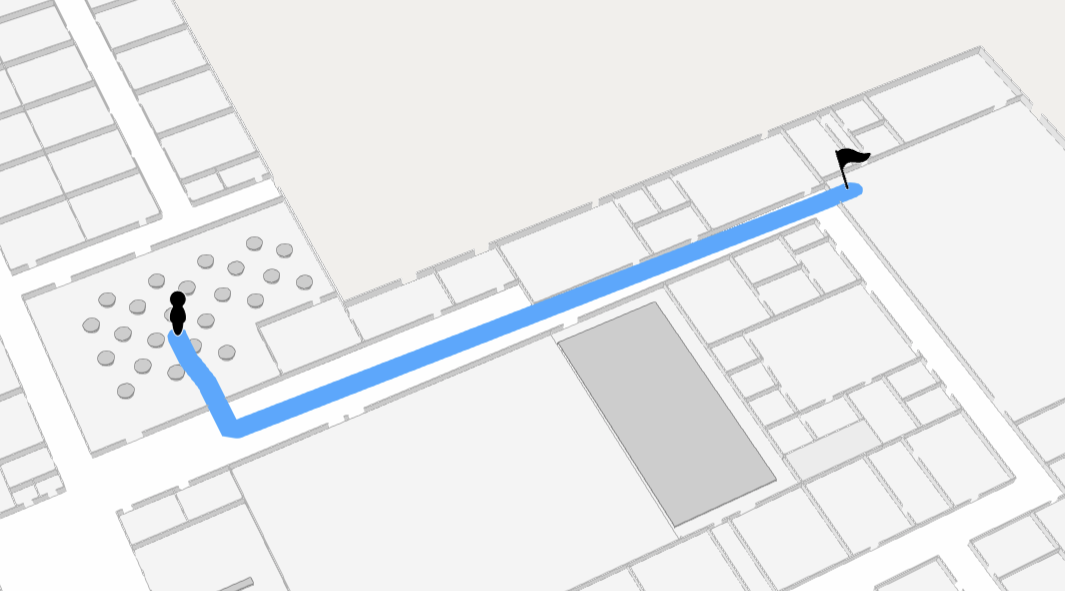
Navigation.draw() allows for easily drawing multiple components that make up a wayfinding illustration. It shows a human figure to mark the start point, a path with animated directional arrows, pulses in the direction of travel and a pin to mark the destination. Each of these components can be customized to match an app's style.
The following sample uses the default navigation settings to navigate from the Cafeteria to the Gymnasium.
// Get the spaces for the first and second spaces to navigate to and from.
const firstSpace = mapData.getByType('space').find(s => s.name === 'Cafeteria');
const secondSpace = mapData.getByType('space').find(s => s.name === 'Gymnasium');

// Ensure that the spaces exist.
if (firstSpace && secondSpace) {
    const directions = mapData.getDirections(firstSpace, secondSpace);

    if (directions) {
        // Add a path from the first space to the second space.
        mapView.Navigation.draw(directions);
    }
}
The navigation visualization can be customized by passing in a TNavigationOptions object to Navigation.draw(). The following example demonstrates how to customize the navigation visualization, using the pathOptions, markerOptions and createMarkers properties.
let navigationOptions: TNavigationOptions = {
    pathOptions: {
        displayArrowsOnPath: true,
        animateArrowsOnPath: true,
        accentColor: '#ffffff',
    },
    markerOptions: {
        departureColor: '#228b22',
        destinationColor: '#ff6347',
    },
    createMarkers: {
        departure: (instruction: TDirectionInstruction) => {
            const marker = mapView.Markers.add(instruction.coordinate, '<div>Departure</div>');
            return marker;
        },
        destination: (instruction: TDirectionInstruction) => {
            const marker = mapView.Markers.add(instruction.coordinate, '<div>Destination</div>');
            return marker;
        },
        connection: (instruction: TDirectionInstruction) => {
            const marker = mapView.Markers.add(instruction.coordinate, '<div>Connection</div>');
            return marker;
        },
    },
};

mapView.Navigation.draw(directions, navigationOptions);
Navigating From a Click Event
A navigation start or end point may originate from a user clicking on the map. It is possible to create a start and or end point using the click event and accessing its TEvents payload. The code shown below uses the click position as a starting point to create directions. nearRadius and farRadius are described in the Path Styles section later in this guide.
mapView.on('click', async event => {
    const clickedLocation = event.coordinate;
    const destination = mapData.getByType('space').find(s => s.name === 'Gymnasium');

    // If the destination is found, navigate to it.
    if (destination) {
        //Ensure that directions could be generated (user clicked on a navigable space).
        const directions = mapData.getDirections(clickedLocation, destination);

        if (directions) {
            // Navigate from the clicked location to the gymnasium.
            mapView.Navigation.draw(directions, {
                pathOptions: {
                    nearRadius: 1,
                    farRadius: 1,
                },
            });
        }
    }
});
Multi-Floor Wayfinding
Using Navigation, no additional work is needed to provide wayfinding between floors. Whenever a user needs to switch a floor, an interactive tooltip with an icon indicating the type of Connection (such as an elevator or stairs) will be drawn. By clicking or tapping the tooltip, the map view switches to the destination floor.
The following CodeSandbox gives an example of multi floor navigation.
Multi-Destination Wayfinding
Multi-segment directions are directions that include multiple legs. They can be created by passing an array of destinations to MapData.getDirectionsMultiDestination().
// Pass an array of destinations to create multi-segment directions.
const directions = mapData.getDirectionsMultiDestination(departure, destinations);
The following CodeSandbox demonstrates how to create multi-segment directions and draw them using Navigation.
Wayfinding Using Accessible Routes
When requesting directions, it is important to consider the needs of the user. Users with mobility restrictions may require a route that avoids stairs and escalators and instead uses ramps or elevators.
The getDirections method accepts TGetDirectionsOptions, which allows specifying whether an accessible route should be returned. By default, the shortest available route is chosen. The following code demonstrates how to request directions that make use of accessible routes.
const directions = await mapData.getDirections(space1, space2, { accessible: true });
Drawing a Path
While Navigation provides a complete start and end navigation illustration, it may be desired to draw just the path. This can be done using Paths.
Note that the MapView class implements the Paths interface and exposes it as MapView.Paths. Use MapView.Paths to utilize Paths methods.
Paths can be drawn from one coordinate to another using Paths.add(). If using just two coordinates, the path will be drawn straight between the two points. This may work for some scenarios, but in most cases an app will need to show the user their walking path, going through doors and avoiding walls and other objects. Such a path of coordinates can be created by calling the MapData.getDirections() method, passing in a start and end TNavigationTarget. Note that a Space requires an entrance to be used as a target.
The width of the path is set using the nearRadius and farRadius parameters. These values are in meters. nearRadius is the path width used at the lowest zoom level closest to the ground and farRadius is used at the highest zoom level. Additional path styles are outlined later in this guide in the Path Styles section.
// Get the directions between two spaces.
const directions = mapData.getDirections(startSpace, endSpace);
// Draw a path using the directions' coordinates array to show the route.
path = mapView.Paths.add(directions.coordinates, {
    nearRadius: 0.5,
    farRadius: 0.5,
});
The following CodeSandbox draws a path from one location to another. Click on a room to set the departure point, then click another room to set the destination. When a path is shown, clicking anywhere will remove it.
Removing Paths
There are two methods that can be used to remove paths. Paths.remove() accepts a path to remove and is used to remove a single path. To remove all paths, IPaths.removeAll() can be used.
// Remove a single path.
mapView.Paths.remove(path);
// Remove all paths
mapView.Paths.removeAll();
Path Styles
Mappedin JS offers many options to customise how paths appear to the user. Path animations, color, width and many more options can be set using TAddPathOptions, which is shown below.
TAddPathOptions: {
    adjustedAltitude?: boolean;
    animateArrowsOnPath?: boolean;
    animateDrawing?: boolean;
    color?: string;
    displayArrowsOnPath?: boolean;
    drawDuration?: number;
    farRadius?: number;
    farZoom?: number;
    interactive?: boolean;
    maxAdjustedAltitude?: number;
    minAdjustedAltitude?: number;
    nearRadius?: number;
    nearZoom?: number;
    pulseColor?: string;
    pulseIterations?: number;
    pulsePauseDuration?: number;
    showPulse?: boolean;
}
TAddPathOptions
- adjustedAltitude - Boolean to set whether to vertically adjust the path to the tallest point.
- animateArrowsOnPath - Boolean to set whether animated arrows should be drawn on the path.
- animateDrawing - Boolean to set whether to animate the drawing of the path in the direction of travel.
- color - Path color
- displayArrowsOnPath - Boolean to set whether to show arrows on the path.
- drawDuration - Duration of path drawing in milliseconds if
animateDrawingis enabled. - farRadius - Radius of path at furthest zoom, in metres.
- farZoom - Zoom level where the path size is
farRadius. - interactive - Whether the path should be clickable.
- maxAdjustedAltitude - The maximum altitude of the path in meters.
- minAdjustedAltitude - The minimum altitude of the path in meters.
- nearRadius - Radius of path at nearest zoom, in metres.
- nearZoom - Zoom level in meters where the path size is
nearRadius. - pulseColor - Colour of path pulse.
- pulseIterations - Number of iterations to pulse to indicate direction.
- pulsePauseDuration - The number of milliseconds to wait before starting the next pulse after the current pulse travels the entirety of the path.
- showPulse - Boolean whether to show an animated pulse indicating the direction of travel.
Dynamic Routing
When generating directions, Mappedin JS provides the most direct route possible between the origin and destination. There can be scenarios when this is not desired, such as when there there is an obstruction like a spill that requires cleaning or where maintenance crews are active.
The MapData.getDirections() method accepts a zones parameter that denotes areas that could be avoided. Zones are defined using TDirectionZone and contain a cost, floor and geometry.
cost represents the additional cost for navigation through the zone and can range from from 0 to Infinity. A cost of 0 will make the zone free to navigate through. A zone cost of Infinity will block passage through the zone. Multiple zones occupying the same location they are added together, along with the cost from the map. The SDK may route directions through a zone if all other routes have a higher cost.
floor represents the floor for the zone. If not specified the zone blocks all floors.
geometry is held within a Feature that contains a MultiPolygon or Polygon.
The following CodeSandbox demonstrates the use of zones to alter directions. Left click to add a zone with a cost of 10. Right click to add a zone with a cost of Infinity. Middle click to clear all zones. Try stacking multiple zones on top of each other and observe how the lowest cost route is used.
Turn-by-Turn Directions
Turn-by-Turn directions are a set of text instructions describing the route the user needs to take. An example is "Turn right and go 10 meters". These could be shown to the user in a list to give them an overview with all steps they need to take, or the current instruction could be displayed along with a map showing the next leg of their journey.
The code sample assembles these actions together and:
- Gets directions between the start and end Space.
- Draws a path using the directions' coordinates.
- Creates a Marker with textual turn-by-turn instructions for each leg in the journey. Rerfer to the Markers guide for more information on using Markers.
// Get directions from the first space to the second space.
const directions = mapData.getDirections(firstSpace, secondSpace);

// Add a path from the first space to the second space.
mapView.Paths.add(directions.coordinates);

// Add markers for each direction instruction.
directions.instructions.forEach((instruction: TDirectionInstruction) => {
    const markerTemplate = `
		<div class="marker">
			<p>${instruction.action.type} ${instruction.action.bearing ?? ''} in ${Math.round(
        instruction.distance
    )} meters.</p>
		</div>`;

    mapView.Markers.add(instruction.coordinate, markerTemplate, {
        rank: 4,
    });
});
The following CodeSandbox demonstrates how to create and display turn-by-turn directions using Markers.