Microsoft Places IMDF Export
Microsoft Places is currently in a preview state and is under active development by Microsoft.
The IMDF export requires use of Powershell and knowledge of resources in Microsoft Places.
Microsoft Places is a new AI-powered connected workplace app that reimagines flexible work. It helps you coordinate where work happens, modernise the workplace experience and improve employee connections, and optimise the workplace based on changing employee needs.
Use an indoor map created with Mappedin in Microsoft Places to provide users with a visual representation of a building.

Configure the Mappedin Indoor Map
Unsure how to create an indoor map? Watch the Mappedin Guided Video Tutorials to getting started.
Once the indoor map has been created, objects and spaces need to be named to match the display name of the corresponding Microsoft Places conference rooms and desk pools. The following table outlines the mapping between Mappedin resources and Microsoft Places resources.
| Microsoft Places Resource | Mappedin Resource | Configuration |
|---|---|---|
| Conference Room - A room that can be booked. | Room - An area surrounded by walls with 1 or more doors. | Mappedin Room Name must match the Conference Room Display Name. |
| Desk Pool - A pool of desks with one or more seats that can be booked. | Object - An object that is placed within a space. | Object Name must match the Desk Pool Display Name. |
| Desk - An individual desk that can be booked. | Object - An object that is placed within a space. | Object Name must match the Individual Desk Display Name. |
| Floor - A level in a building. | Floor - A level in a building. | Places will use the floor name from Mappedin, prefixed with Floor. The Places sort order should match the elevation of the floor in Mappedin. |
| Building - The top level container for floors. | Map - A map containing all elements listed above. | Configured in detail in the Configure Microsoft Places section below |
| Restroom | Room with the name of bathroom, restroom, washroom, or toilet | Mappedin Room Name matches one of the names listed to the left. |
| Kitchen | Room with the name of kitchen, kitchenette or cooking. | Mappedin Room Name matches one of the names listed to the left. |
| Office | A room with a name that doesn't match a conference room name. | |
| Unspecified | A room without a name. |
Matching Mappedin Rooms with Conference Rooms
Watch the Mappedin Walls & Rooms Tutorial for help with creating spaces.
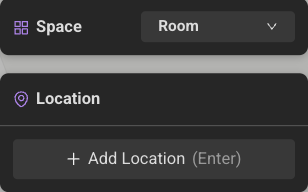
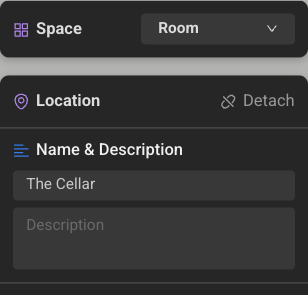
The name of the Mappedin Room must match the Display Name of the corresponding Places Conference Room. To set the room name, click on the room and press the + Add Location button. Enter a value and press enter to save the location name. The screen shots below show the Name field entered in Mappedin Maker and displayed in Microsoft Places.
Mappedin Room Name
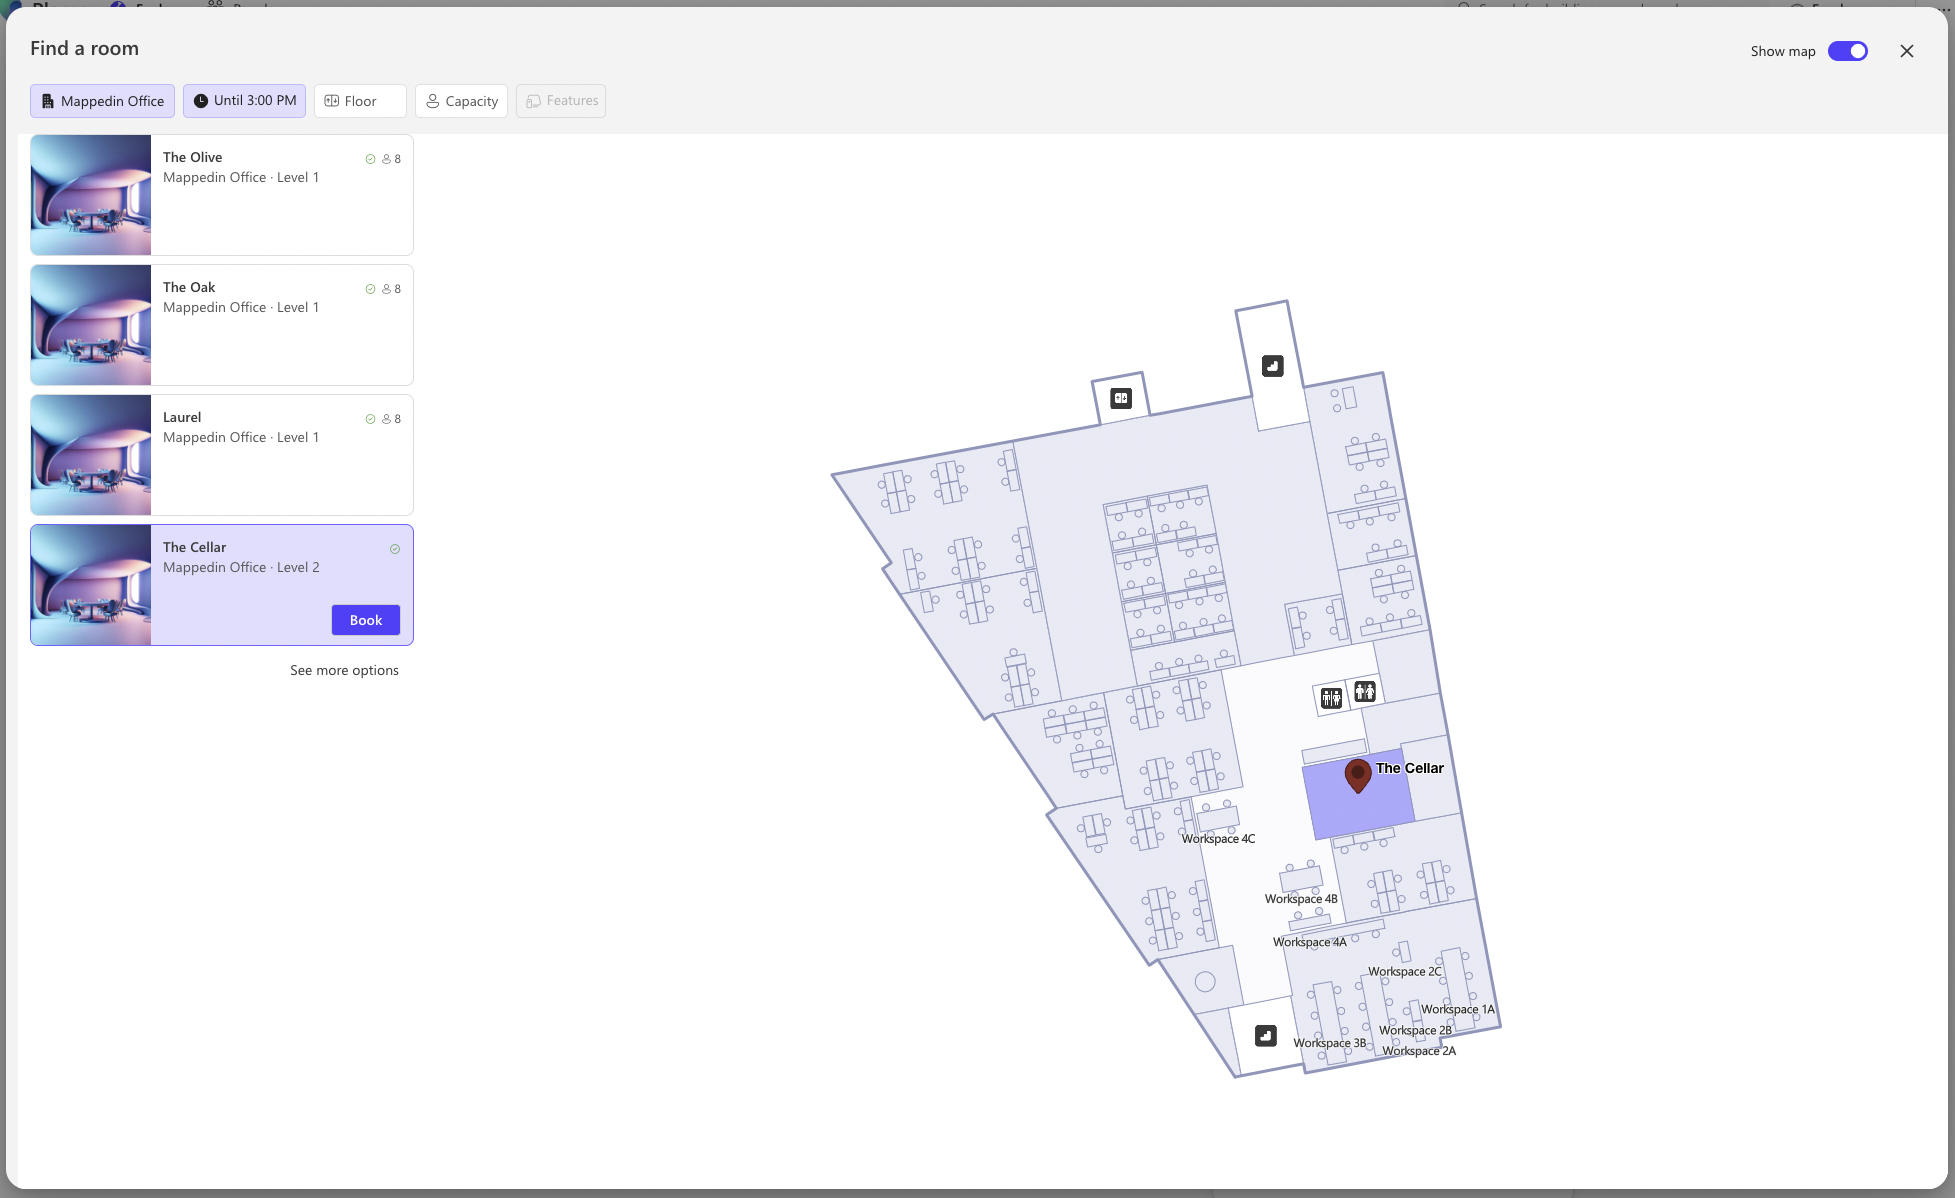
Places Conference Room Name
Matching Objects with Desk Pools
Watch the Mappedin Object Tutorial for help with creating objects.
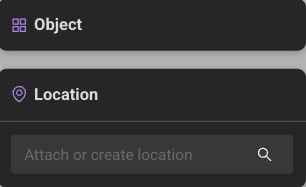
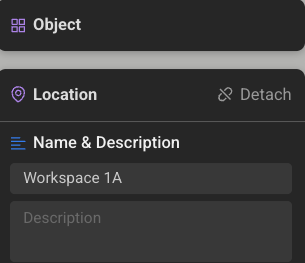
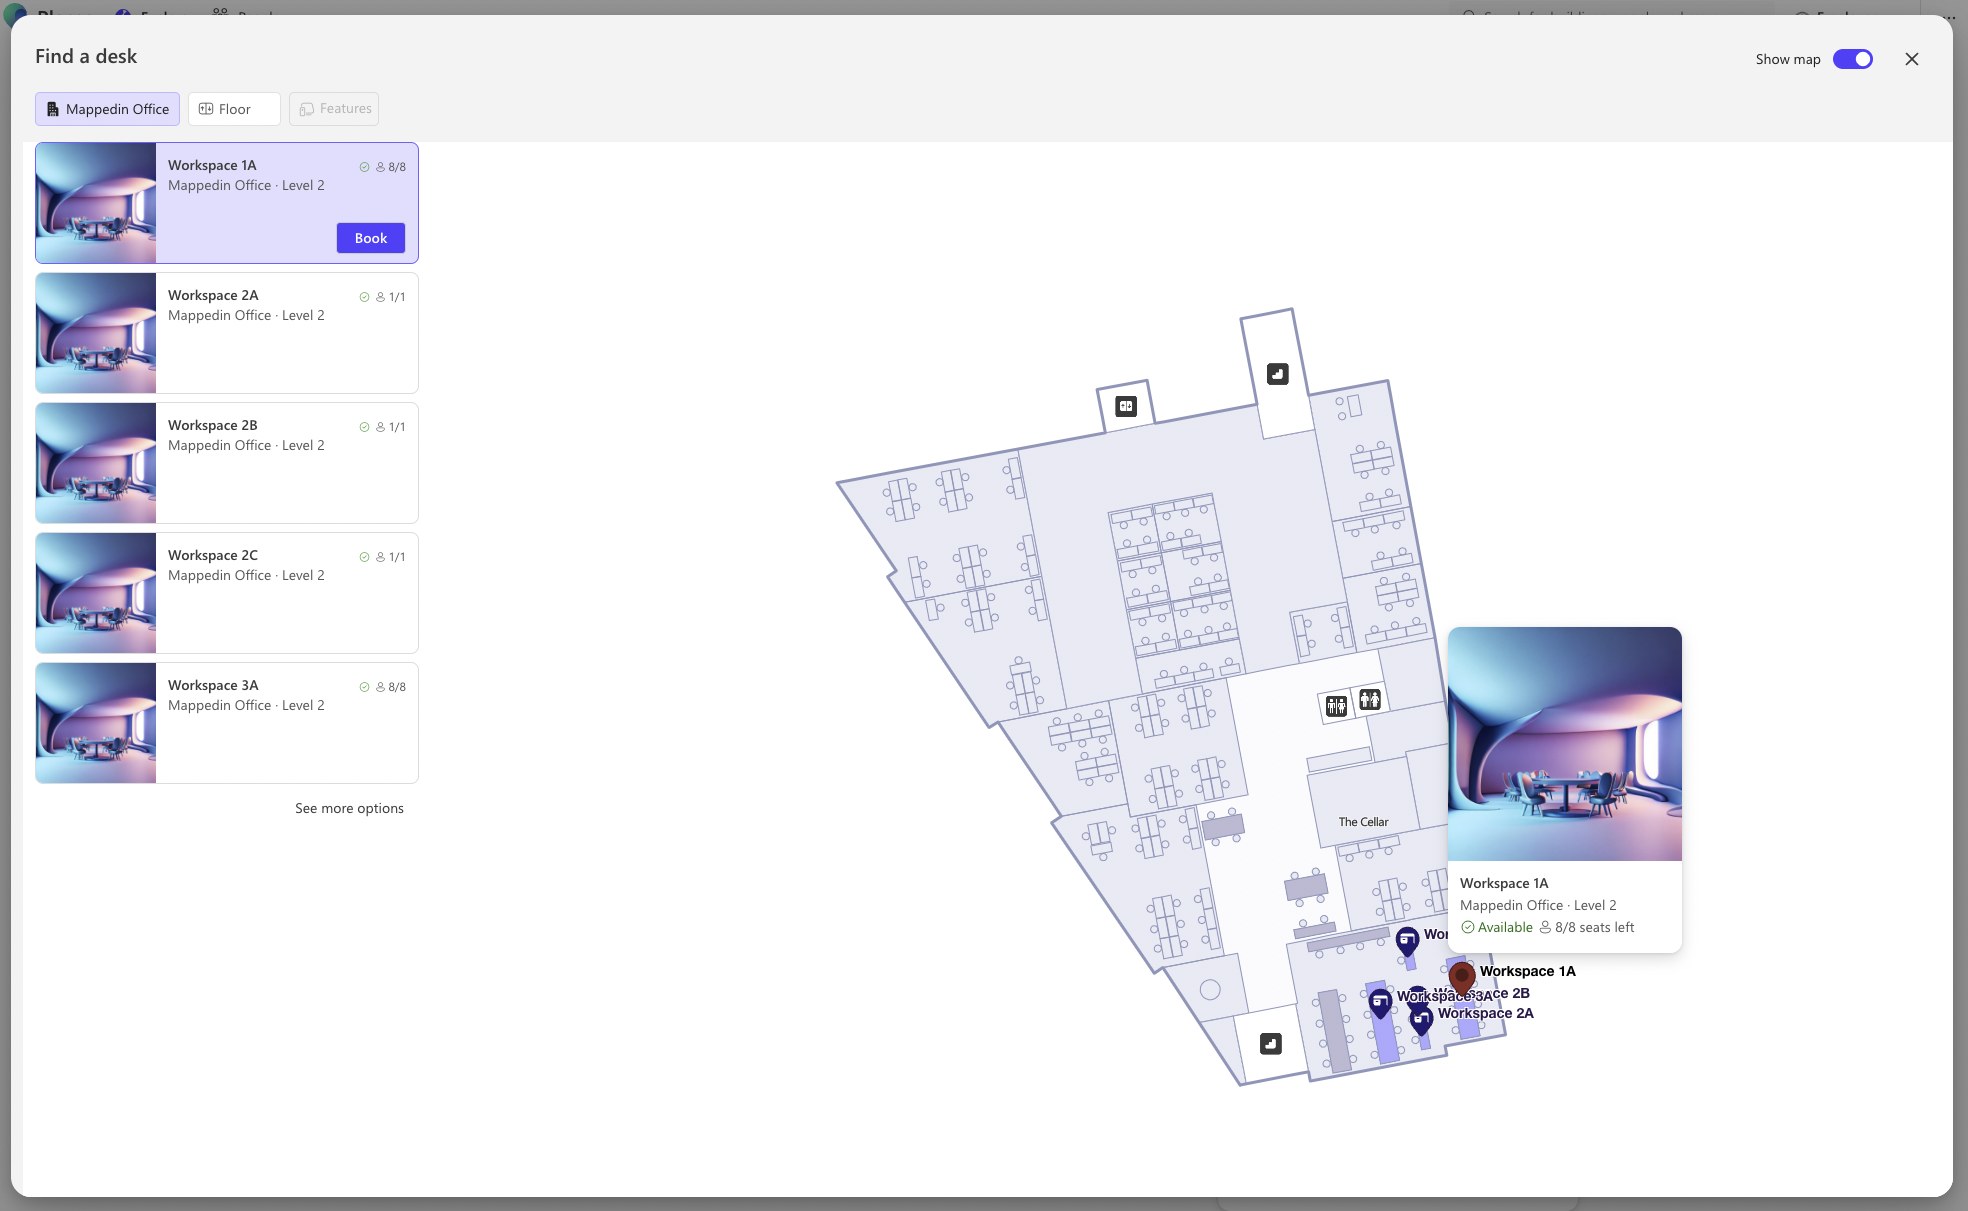
The name of the Mappedin Object must match the Display Name of the corresponding Places Desk Pool. To set the object name, click on the object and press the + Add Location button. Enter a value and press enter to save the location name. The screen shots below show the Name field entered in Mappedin Maker and displayed in Microsoft Places.
Mappedin Object Name
Places Desk Pool Name
Configure Microsoft Places
Use the following steps to configure Microsoft Places for use with Mappedin indoor maps.
If you have already configured Microsoft Places, skip to Configure a New Map.
1. Install Powershell Version 7+
Powershell version 7+ is required. Attempting to use a lower version will result in errors. Use winget to install Powershell using the following command:
winget install --id Microsoft.PowerShell.Preview --source winget
2. Run the Microsoft Places Install Script
Ensure you are using an account that has the Places Management prerequisites of Exchange Admin and TenantPlacesManagement role.
Right click on PowerShell v7 from start menu, and select Run as Administrator. Execute the following commands:
Install-Script -Name DeployPlaces
DeployPlaces
3. Create Building and Floors
Next, create the building and floors. To do so download from Places the existing CSV file containing the building and floors using the following Powershell commands:
Connect-MicrosoftPlaces
Initialize-Places
These commands will prompt with the questions below, choose option #1.
1. Export suggested mapping CSV of rooms to buildings/floors.
2. Import mapping CSV to automatically create buildings/floors and room mappings.
3. Export PowerShell script with commands to manually create buildings/floors and room mappings based on an imported CSV.
If no buildings have been configured, the CSV file will contain headings only. Use Notepad or Excel to modify the CSV file. If using Excel, ensure to save the file as a CSV and not as an Excel spreadsheet.
Delete all headings/columns except for InferredBuildingName, InferredFloorName and PrimarySmtpAddress.
Populate the CSV file with your building information. Places prefixes each floor name with Floor. In the example below, 1 will be shown as Floor 1.
InferredBuildingName,InferredFloorName,PrimarySmtpAddress
Corporate Headquarters,1,
Corporate Headquarters,2,
Corporate Headquarters,Basement,
Re-run these Powershell commands to connect to and initialize Places.
Connect-MicrosoftPlaces
Initialize-Places
Choose option #2 to import the modified CSV file.
1. Export suggested mapping CSV of rooms to buildings/floors.
2. Import mapping CSV to automatically create buildings/floors and room mappings.
3. Export PowerShell script with commands to manually create buildings/floors and room mappings based on an imported CSV.
Set Floor Elevation
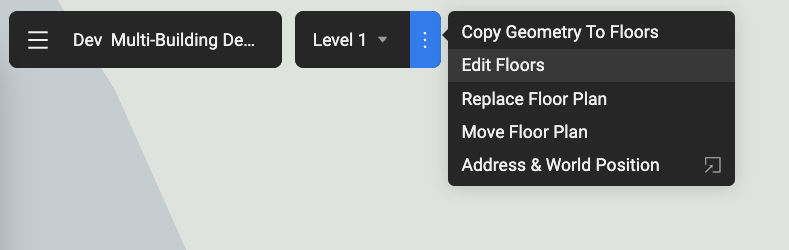
Align the floor's sort order in places with the elevation in Mappedin. The sort order value should match the elevation of the floor in Mappedin Maker. To view the elevation open Mappedin Maker and choose Edit Floors.
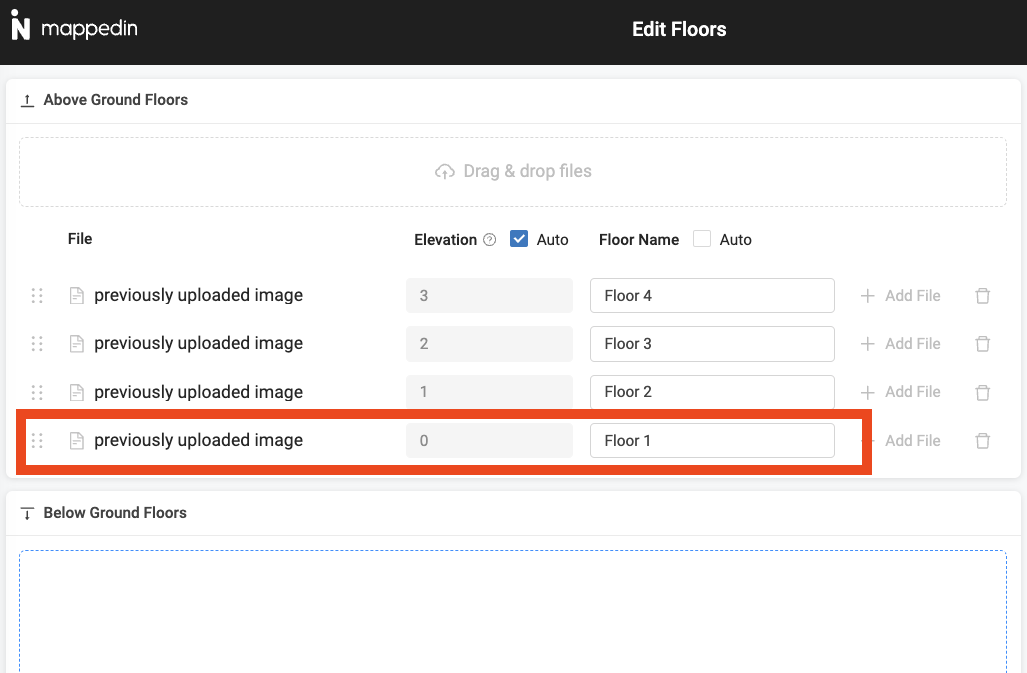
In the screen shots above, Floor 1 is set to elevation 0, which should be used as the sort order for that floor. The ground floor is set to 0, floors above ground are set to positive integers and floors below ground are set to negative integers.
Locate the Places floor identity for each floor using the Powershell command below.
Get-Placev3 -Type Floor
Use the identity value for each floor returned from the command above and its elevation from Mappedin to set the floor sort order in Places.
Set-Placev3 -Identity <FLOOR_IDENTITY> -SortOrder 0
4. Create Rooms
Create room resources in Microsoft Exchange Admin.
An Exchange room name must match a Mappedin space name. If there is no match the room will not be shown on the map within Places.
Use the Powershell command Get-PlaceV3 to check if rooms have been synchronised from Exchange. Once they have, each room can be assigned to the correct floor using Set-PlaceV3.
It may take up to 24 hours for room resources to propagate from Exchange to Places. The map must be re-uploaded to Places after propagation completes.
Exchange assigns each room an email address. Use the room's email address as the Identity parameter and floor identity value as the ParentId. The command Get-Placev3 -Type Floor can be used to get a list of all floors and their identifiers.
Set-PlaceV3 -Identity room@yourDomain.com -ParentId <YOUR_FLOOR_ID>
5. Creating a Desk Pool
Microsoft Places can configure clusters of desks. Desk clusters are managed together and known as desk pools (they're also referred to as workspaces). By using desk pools users can reserve a place to work, when they visit the office.
It may take up to 24 hours for desk pools to propagate from Exchange to Places. The map must be re-uploaded to Places after propagation completes.
The following Powershell commands can be used to create and configure a desk pool. The Exchange Admin role is required to execute these commands. In the example below 1005 is used as the desk pool's name.
A desk pool name must match a Mappedin space name. If there is no match the desk pool will not be shown on the map within Places.
Connect to Exchange:
Connect-ExchangeOnline
Create a mailbox for the Desk Pool:
New-Mailbox -Room -Alias 1005 -Name 1005 | Set-Mailbox -Type Workspace
Set the Timezone for Desk Pool:
Set-MailboxCalendarConfiguration -Identity 1005 -WorkingHoursTimeZone "Eastern Standard Time" -WorkingHoursStartTime 09:00:00
Set the reservation rule for Desk Pool:
Set-CalendarProcessing -Identity 1005 -EnforceCapacity $True -AllowConflicts $True
Connect to Microsoft Places:
Connect-MicrosoftPlaces
Look up the desk's building, floor and section and place the desk there:
$building = Get-PlaceV3 -Type Building | Where-Object -Property DisplayName -eq "YOUR_BUILDING_NAME"

$floor = Get-PlaceV3 -AncestorId $building.PlaceId | Where-Object -Property DisplayName -eq "YOUR_FLOOR_NAME"

$section = Get-PlaceV3 -Type Section -AncestorId $floor.PlaceId | Where-Object -Property DisplayName -eq "YOUR_SECTION_NAME"

Set-Placev3 -Identity 1005 -Capacity 10 -Label "1005" -ParentId $section.PlaceId
These changes may take 24 to 48 hours to propagate.
Configure a New Map
After configuring the building, floor and desks in Microsoft Places a Mappedin indoor map can be imported.
If you recently updated a room or workspace in Microsoft Places, it will take up to 48 hours for changes to update in Microsoft's system. If this completes after a map upload you will need to update the existing map.
The Powershell commands below require Powershell 7+. Refer to the Install Powershell Version 7+ section above for the steps to do so.
Connect to Microsoft Places:
Connect-MicrosoftPlaces
Find the building Id:
Get-PlaceV3 -Type Building | ft DisplayName,PlaceId
Generate a CSV from using the PlaceId for the building as the AncestorId:
Adjust the path to the CSV to where it should be saved.
Get-PlaceV3 -AncestorId <YOUR_BUILDING_ID> | export-csv "C:\path\to\save\csv\assets.csv"
Here is an example CSV file.
"PlaceId","DisplayName","Type","Identity","Label","PostalCode","CountryOrRegion","State","City","Street","ParentId","GeoCoordinates","Features","Phone","MTREnabled","AudioDeviceName","VideoDeviceName","DisplayDeviceName","IsWheelChairAccessible","ResourceLinks","AlternativeNames","Kind","Category","Tags","Capacity","TimeZone","TimeSegments","ExternalIds","IsManaged","BookingType","ResourceDelegates","Building","Floor","FloorLabel","Localities","HasMap","MailboxOID"
"7a91c534-8e15-42d3-9f2b-6c89d2f3e901","My Office","Building","My Office_7a91c534-8e15-42d3-9f2b-6c89d2f3e901","","N2L4E9","CA","ON","Waterloo","1 Main St.","",,"{ }",,,,,,,"{ }","System.Collections.Generic.List`1[System.String]","","","System.Collections.Generic.List`1[System.String]",,,"System.Collections.Generic.List`1[System.String]","System.Collections.Generic.List`1[System.String]",,,"System.Collections.Generic.List`1[System.String]",,,,"System.Collections.Generic.List`1[System.String]","True",
"2f5d9e67-1b3c-4a82-b5d8-9c4e7f8a2d45","Level 2","Floor","Level 2_2f5d9e67-1b3c-4a82-b5d8-9c4e7f8a2d45","",,,,,,"7a91c534-8e15-42d3-9f2b-6c89d2f3e901",,"{ ""SortOrder"": ""1"" }",,,,,,,"{ }","System.Collections.Generic.List`1[System.String]","","","System.Collections.Generic.List`1[System.String]",,,"System.Collections.Generic.List`1[System.String]","System.Collections.Generic.List`1[System.String]",,,"System.Collections.Generic.List`1[System.String]",,,,"System.Collections.Generic.List`1[System.String]","True",
"9e3f8c12-6d4b-4e7a-8f5c-1d2b3a4c5e6f","Basement","Floor","Basement_9e3f8c12-6d4b-4e7a-8f5c-1d2b3a4c5e6f","",,,,,,"7a91c534-8e15-42d3-9f2b-6c89d2f3e901",,"{ ""SortOrder"": ""-1"" }",,,,,,,"{ }","System.Collections.Generic.List`1[System.String]","","","System.Collections.Generic.List`1[System.String]",,,"System.Collections.Generic.List`1[System.String]","System.Collections.Generic.List`1[System.String]",,,"System.Collections.Generic.List`1[System.String]",,,,"System.Collections.Generic.List`1[System.String]","True",
"4d5e6f7a-8b9c-4d2e-3f1a-2b3c4d5e6f7a","Level 1","Floor","Level 1_4d5e6f7a-8b9c-4d2e-3f1a-2b3c4d5e6f7a","",,,,,,"7a91c534-8e15-42d3-9f2b-6c89d2f3e901",,"{ ""SortOrder"": ""0"" }",,,,,,,"{ }","System.Collections.Generic.List`1[System.String]","","","System.Collections.Generic.List`1[System.String]",,,"System.Collections.Generic.List`1[System.String]","System.Collections.Generic.List`1[System.String]",,,"System.Collections.Generic.List`1[System.String]",,,,"System.Collections.Generic.List`1[System.String]","True",
"1a2b3c4d-5e6f-7a8b-9c0d-1e2f3a4b5c6d","The Cellar","Room","RoomTheCellar@example.com","","","","","","","2f5d9e67-1b3c-4a82-b5d8-9c4e7f8a2d45",,"{ ""IsManaged"": ""False"", ""BookingType"": ""Standard"" }",,,,,,,"{ }","System.Collections.Generic.List`1[System.String]","","","System.Collections.Generic.List`1[System.String]",,"","System.Collections.Generic.List`1[System.String]","System.Collections.Generic.List`1[System.String]",,,"System.Collections.Generic.List`1[System.String]",,,,"System.Collections.Generic.List`1[System.String]","False","1a2b3c4d-5e6f-7a8b-9c0d-1e2f3a4b5c6d"
"5f6a7b8c-9d0e-1f2a-3b4c-5d6e7f8a9b0c","The Olive","Room","RoomTheOlive@example.com","","","","","","","4d5e6f7a-8b9c-4d2e-3f1a-2b3c4d5e6f7a",,"{ ""IsManaged"": ""False"", ""BookingType"": ""Standard"" }",,,,,,,"{ }","System.Collections.Generic.List`1[System.String]","","","System.Collections.Generic.List`1[System.String]","8","","System.Collections.Generic.List`1[System.String]","System.Collections.Generic.List`1[System.String]",,,"System.Collections.Generic.List`1[System.String]",,,,"System.Collections.Generic.List`1[System.String]","False","5f6a7b8c-9d0e-1f2a-3b4c-5d6e7f8a9b0c"
"8a9b0c1d-2e3f-4a5b-6c7d-8e9f0a1b2c3d","The Oak","Room","RoomTheOak@example.com","","","","","","","4d5e6f7a-8b9c-4d2e-3f1a-2b3c4d5e6f7a",,"{ ""IsManaged"": ""False"", ""BookingType"": ""Standard"" }",,,,,,,"{ }","System.Collections.Generic.List`1[System.String]","","","System.Collections.Generic.List`1[System.String]","8","","System.Collections.Generic.List`1[System.String]","System.Collections.Generic.List`1[System.String]",,,"System.Collections.Generic.List`1[System.String]",,,,"System.Collections.Generic.List`1[System.String]","False","8a9b0c1d-2e3f-4a5b-6c7d-8e9f0a1b2c3d"
"b1c2d3e4-f5a6-7b8c-9d0e-1f2a3b4c5d6e","1005","Space","1005_b1c2d3e4-f5a6-7b8c-9d0e-1f2a3b4c5d6e","1005","","","","","","2f5d9e67-1b3c-4a82-b5d8-9c4e7f8a2d45",,"{ ""IsManaged"": ""False"", ""BookingType"": ""Standard"" }",,,,,,,"{ }","System.Collections.Generic.List`1[System.String]","","","System.Collections.Generic.List`1[System.String]","12","","System.Collections.Generic.List`1[System.String]","System.Collections.Generic.List`1[System.String]",,,"System.Collections.Generic.List`1[System.String]",,,,"System.Collections.Generic.List`1[System.String]","False","b1c2d3e4-f5a6-7b8c-9d0e-1f2a3b4c5d6e"
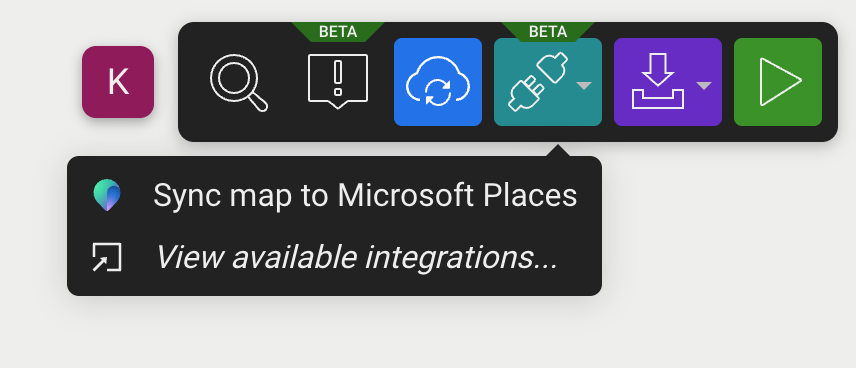
Open Mappedin Maker and select the map. From the Integrations Menu choose Sync map to Microsoft Places.
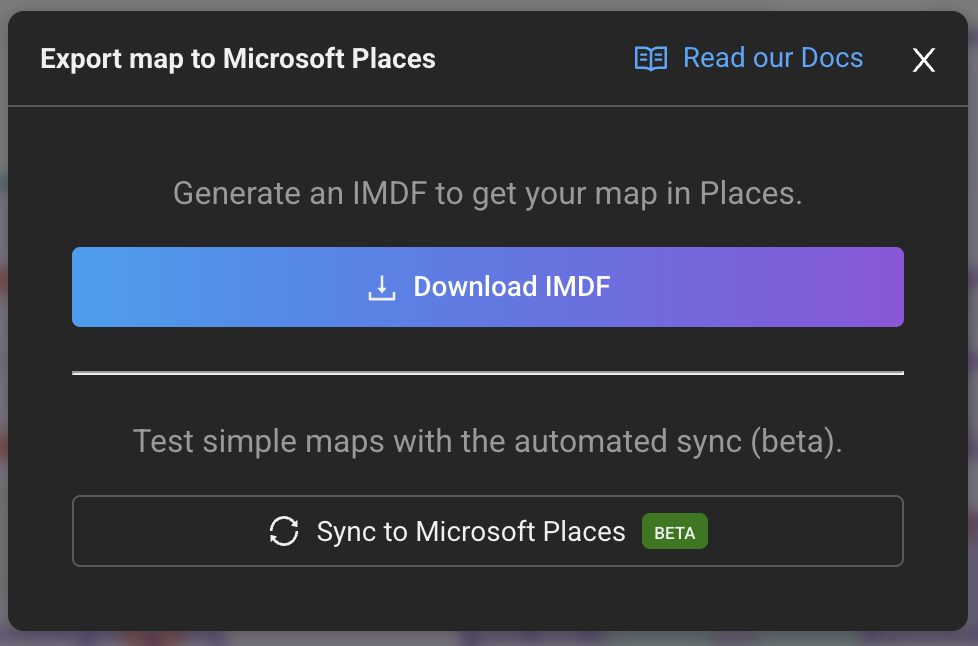
Click the Download IMDF button.
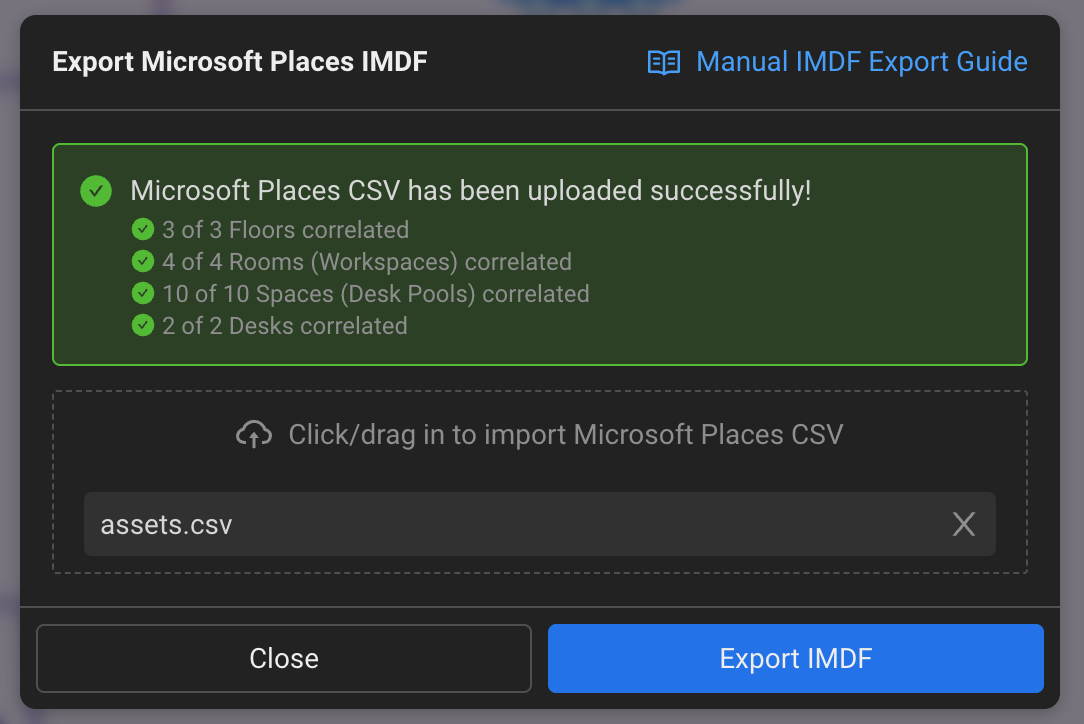
Upload the CSV file exported from Microsoft Places and then click the Export IMDF button to download an IMDF map export.

Upload the map export to Places:
Adjust the path to where the IMDF map export is saved.
New-Map -BuildingId <YOUR_BUILDING_ID> -FilePath "C:\path\to\map\export\imdf_correlated.zip"
Update an Existing Map
To update a map in Microsoft Places the existing map must be deleted and a new map imported. Follow the steps below to delete an existing map.
The Powershell commands below require Powershell 7+. Refer to the Install Powershell Version 7+ section above for the steps to do so.
Connect to Microsoft Places:
Connect-MicrosoftPlaces
Find the building Id:
Get-PlaceV3 -Type Building | ft DisplayName,PlaceId
Remove the map:
Remove-Map -BuildingId <YOUR_BUILDING_ID>
To add a new updated map, follow the steps in the Configure a New Map section.