Wayfinding
The map setup is exactly what we did in the earlier tutorials, where we load the venue data and then render the map with showVenue. We then label all the polygons with Flat labels, to keep the visual stress of the map to a minimum, while still providing the viewer hints on what's around them.
In this example, we take the start and end locations of our navigation by selecting by name from the venue.locations. A typical UI would normally have a click/tap option for selecting locations as well as a search option.
MappedinLocation object has a directionsTo() method, which takes the destination as a parameter. That's how we get back the directions, which we then feed to Journey.draw().
const startLocation = venue.locations.find((location) => location.name === 'ThinkKitchen');
const endLocation = venue.locations.find((location) => location.name === 'American Eagle');

const directions = startLocation.directionsTo(endLocation);
mapView.Journey.draw(directions, {
	pathOptions: {
		color: 'green',
	},
});
Journey is a helper class to display single and multi-destination wayfinding easily on the map. Functionality of Journey could be replicated by drawing the paths and adding well designed tooltips at connection points.
Wayfinding From A User's Location
To find out how to start the journey from the user's current location, refer to Wayfinding from Blue Dot in the Blue Dot Guide.
Wayfinding From A Click Event
A navigation start or end point may originate from a user clicking on the map. It is possible to create a start and or end point using the E_SDK_EVENT.CLICK event and accessing its TMapClickEvent payload. The code shown below uses the click position to find the nearest node, which is used as a starting point to create directions.
//Capture the position where the user clicks.
mapView.on(E_SDK_EVENT.CLICK, ({ position }) => {
	//Create coordinates based on their click location.
	const coordinate = mapView.currentMap.createCoordinate(position.latitude, position.longitude);

	//Get the nearest node to the coordinates.
	const nearestNode = coordinate.nearestNode;

	//Create a destination to navigate to.
	const endLocation = venue.locations.find((location) => location.name === 'Lindt');

	//Create directions between the start and end locations.
	const directions = nearestNode.directionsTo(endLocation);

	//Get directions between the start and end locations.
	mapView.Journey.draw(directions);
});
Try this type of navigation using the following code sandbox.
Multi-Floor Wayfinding
Using Journey helper, no additional work is needed to provide wayfinding between floors. Whenever a user needs to switch a floor, an interactive tooltip with an icon indicating the type of connection (such as an elevator or escalator) will be drawn. By clicking or tapping the tooltip, the map view switches to the destination floor.
Wayfinding Using Accessible Routes
When requesting directions for a journey, it is important to consider the needs of the user. Users with mobility restrictions may require a route that avoids stairs and escalators and instead uses ramps or elevators.
The directionsTo method accepts TDirectionToOptions, which allows specifying whether an accessible route should be returned. By default, the shortest available route is chosen. The following code demonstrates how to request directions that make use of accessible routes.
const directions = startLocation.directionsTo(endLocation, {
	accessible: true,
});
Multi-Destination Wayfinding
With Mappedin JS, it's possible to draw a path including multiple waypoints. To generate directions, create a DestinationSet from polygons, locations or nodes and request directions from a starting location just like with A-B navigation with startLocation.directionsTo(destinationSet).
const startLocation = venue.locations.find((l) => l.name === 'Parking Lot E')!;
const destinations = [
	venue.locations.find((l) => l.name === 'Apple'),
	venue.locations.find((l) => l.name === 'Microsoft'),
	venue.locations.find((l) => l.name === 'ThinkKitchen'),
	venue.locations.find((l) => l.name === 'Parking Lot E'),
] as MappedinLocation[];

const directions = startLocation.directionsTo(new MappedinDestinationSet(destinations));

mapView.Journey.draw(directions);
Once the user has completed a segment of the journey, the active step can be changed with .setStep(). The following demo will move through the steps when user clicks on the map using the CLICK -event callback.
mapView.on(E_SDK_EVENT.CLICK, (_) => {
	mapView.Journey.setStep(++step % destinations.length);
});
The Journey.draw() function takes an TJourneyOptions argument which we can use to style our active and inactive paths. We'll modify pathOptions to be wider than the inactive portions, while adjusting inactivePathOptions to be a light blue color. If desired, the arrows and the pulse on the path can also be styled or removed completely.
mapView.Journey.draw(directions, {
	pathOptions: {
		nearRadius: 2.5,
		farRadius: 2.5,
	},
	inactivePathOptions: {
		nearRadius: 2,
		farRadius: 2,
		color: 'lightblue',
	},
});
Wayfinding Using Dynamic Routes
Routes can be modified by editing the source map, but there may be situations where an app needs to dynamically adjust a route at runtime.
For example an app may connect to an emergency system, which closes off part of a building when a fire is detected. This area could be marked on the map as a danger zone and users directed along routes that avoid the fire. Another example is a store or warehouse where aisles are temporarily shut down while a fork lift delivers goods.
There are two key methods to use to make use of dynamic routes. The first is MappedinCoordinate.nodesInRadius. nodesInRadius returns all nodes within a provided radius of the coordinate. An array of the Ids of the returned nodes can then be assigned to the TDirectionToOptions.excludedNodeIds parameter that is passed to the directionsTo method found in MappedinLocation, MappedinPolygon, MappedinNode and MappedinNavigatable.
It is also possible to exclude MappedinVortex from the route. A MappedinVortex could be returned in the MappedinCoordinate.nodesInRadius for a provided area, however the app may need to remove all MappedinVortex of a certain type. For example in the case of a fire the app may wish to exclude the use of all elevators. This can be done using TDirectionToOptions.excludedVortexIds and providing an array of MappedinVortex Ids.
The following CodeSandbox demonstrates the use of Dynamic Routing. The user is provided with directions from the Apple store to Banana Republic. The route avoids the red circle that represents a danger zone. Click on the map to move the red circle and watch the route be adjusted to avoid it. If it is not possible to avoid the danger zone, no directions will be returned.
Wayfinding Without Using Journey
While Journey is a great utility for drawing a single path with all the features, it may sometimes be limiting. For instance, you may only draw one Journey at a time, and subsequent calls to Journey.draw() will overwrite the previous.
For full control over the route, draw the path using the Paths.add() method within Paths and pass it the directions.path.
const startLocation = venue.locations.find((location) => location.name === 'ThinkKitchen');
const endLocation = venue.locations.find((location) => location.name === 'American Eagle');

const directions = startLocation.directionsTo(endLocation);
mapView.Paths.add(directions.path);
With the release of Mappedin JS v5.8.0 the Paths API has changed.
drawPath(),removePath(), andremoveAllPaths()has been deprecated and there is a new Paths Layer.
This creates a basic path with no extra features. Using this method, you will need to handle both multi-floor navigation and multi-destination wayfinding manually using Tooltips and by drawing multiple paths.
We can draw a secondary path the same way as the first while providing different start and end locations. To make this new path stand out, style it a different color by changing the color property. The documentation for TPathOptions covers the other options available to you.
The CodeSandbox below demonstrates a single map with multiple destination paths.
X-Ray Paths
X-Ray Paths are currently an experimental component of Mappedin JS. While in this state, some features may not behave as intended and APIs may be changed. Experimental features are being tested together with early adopters to fine-tune them.
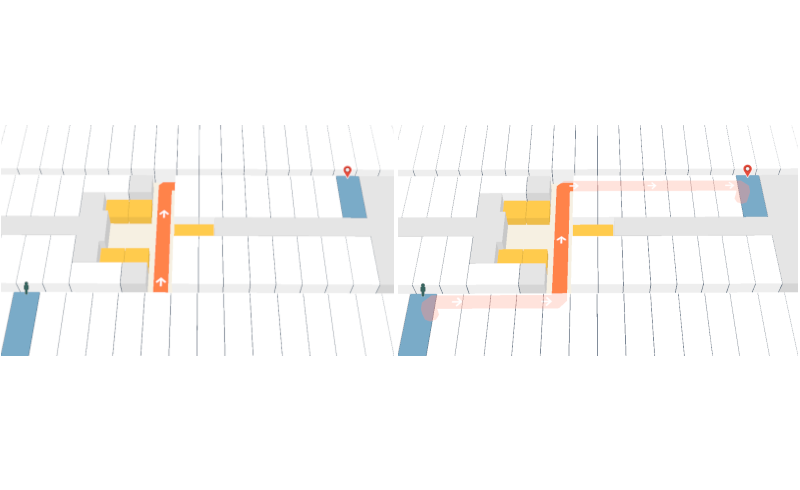
Maps with narrow corridors can benefit from using X-Ray Paths for wayfinding. When enabled, X-Ray Paths cause polygons, such as walls or desks, to become transparent when a path is drawn behind them. This allows the path to remain visible. The screenshot below illustrates a path between cabins on a cruise ship with X-Ray Paths disabled on the left and enabled on the right.
X-Ray Paths are enabled and disabled using the boolean xRayPath parameter of TMapViewOptions object used to initialize a MapView.
X-Ray Paths are enabled by default, but they do require multiBufferRendering to also be enabled. multiBufferRendering is currently disabled by default. The code sample below demonstrates enabling both xRayPath and multiBufferRendering.
const mapView = await showVenue(document.getElementById('app')!, venue, {
	multiBufferRendering: true,
	xRayPath: true,
});
The Codesandbox below demonstrates the use of X-Ray Paths.