Getting Started
Mappedin SDK for React Native version 6 is currently in an alpha state while Mappedin perfects new features and APIs. Open the v6 release notes to view the latest changes.
Using Mappedin SDK for React Native with your own map requires an Pro license. Try a demo map for free or refer to the Pricing page for more information.
Mappedin SDK for React Native enables integration of Mappedin's indoor mapping and navigation capabilities into React Native applications. This SDK provides a native wrapper around Mappedin's web-based mapping technology using a WebView for cross-platform compatibility. Mappedin SDK for React Native uses the react-native-webview package to display the map.
This getting started guide demonstrates how to start a project using Mappedin SDK for React Native. Following this guide results in a working demo with a map that you can interact with (zoom, pan, rotate etc).
Requirements
Mappedin SDK for React Native v6 supports the following:
- React 16.8.0+
- React Native 0.60.0+
- React Native WebView 11.0.0+
- Expo 39+
Mappedin SDK for React Native v6 is available as @mappedin/react-native-sdk@alpha in NPM.
You can find the Mappedin React Native demo application on Github at https://github.com/mappedin/react-native
Coding with AI
Mappedin SDK for React Native provides an llms-mappedin-react-native.txt file that can be used to help with coding when using Large Language Models (LLMs).
Expand for instructions on how to use Mappedin provided llms.txt files with Cursor, Github Copilot, JetBrains AI Assistant and Windsurf.
How to use llms.txt files with LLMs:
- Cursor
- Github Copilot
- JetBrains AI Assistant
- Windsurf
To use the llms.txt file with Cursor:
- Download the
llms.txtfile for this guide. - Create a
.cursordirectory in your project root if it doesn't exist already. - Place the
llms.txtfile in the.cursordirectory. - Start creating a new Cursor rule using Cursor's instructions.
- Set the rule type to:
Agent Requested. - Set the agent description to:
Use this rule whenever a question is asked about Mappedin, Mappedin-JS, Mappedin SDK.. - In the rule body, add the name of the llms.txt file such as:
@llms.txtor@llms-mappedin-js.txt - Optionally, if using Mappedin JS add :
@index.d.ts, referring to theindex.d.tsfile located in thenode_modules/@mappedin/mappedin-js/lib/esm/directory to add all Mappedin types to the rule. - With this configuration, Cursor will automatically use the
llms.txtwhenever a question is asked aboutMappedin,Mappedin-JSorMappedin SDKs. When starting a new chat be sure to mentionMappedinto trigger the rule. - The
llms.txtfile includes:- Detailed explanations of concepts
- Code examples and their context
- Related documentation references
- Source file locations for verification
This helps ensure that Cursor provides assistance that is consistent with Mappedin documentation and best practices, using the same structured information that's available on the Mappedin Developer Portal.
To use the llms.txt file with GitHub Copilot Chat in VS Code:
- Download the
llms.txtfile for this guide. - Create a
.copilotdirectory in your project root if it doesn't exist already. - Place the
llms.txtfile in the.copilotdirectory. - When using Copilot Chat, you can reference the file by saying "Please use the context from the llms.txt file in the .copilot directory".
- The
llms.txtfile includes:- Detailed explanations of concepts
- Code examples and their context
- Related documentation references
- Source file locations for verification
This helps ensure that Copilot provides assistance that is consistent with documentation and best practices, using the same structured information that's available on the Mappedin Developer Portal.
To use the llms.txt file with JetBrains AI Assistant:
- Download the
llms.txtfile for this guide. - Create a
.idea/aidirectory in your project root if it doesn't exist already. - Place the
llms.txtfile in the.idea/aidirectory. - When using the AI Assistant, you can reference the file by saying "Please use the context from the llms.txt file in the .idea/ai directory".
- The
llms.txtfile includes:- Detailed explanations of concepts
- Code examples and their context
- Related documentation references
- Source file locations for verification
This helps ensure that the AI Assistant provides assistance that is consistent with documentation and best practices, using the same structured information that's available on the Mappedin Developer Portal.
To use the llms.txt file with Windsurf in VS Code:
- Download the
llms.txtfile for this guide. - Create a
.windsurfdirectory in your project root if it doesn't exist already. - Place the
llms.txtfile in the.windsurfdirectory. - When using Windsurf Chat, you can reference the file by saying "Please use the context from the llms.txt file in the .windsurf directory".
- The
llms.txtfile includes:- Detailed explanations of concepts
- Code examples and their context
- Related documentation references
- Source file locations for verification
This helps ensure that Windsurf provides assistance that is consistent with documentation and best practices, using the same structured information that's available on the Mappedin Developer Portal.
MapView
The MapView component contains the DOM element of the 3D map and the context wrapper for control of the map. Components which reference the 3D map must be children of the MapView component to have access to the context.
import React from "react";
import { View, StyleSheet } from "react-native";
import { MapView } from "@mappedin/react-native-sdk";

// See Demo API key Terms and Conditions
// Demo Key & Maps: https://developer.mappedin.com/docs/demo-keys-and-maps
const App = () => {
  return (
    <View style={styles.container}>
      <MapView
        options={{}}
        mapData={{
          key: "mik_yeBk0Vf0nNJtpesfu560e07e5",
          secret: "mis_2g9ST8ZcSFb5R9fPnsvYhrX3RyRwPtDGbMGweCYKEq385431022",
          mapId: "660c0c3aae0596d87766f2da",
        }}
      >
      </MapView>
    </View>
  );
};

const styles = StyleSheet.create({
  container: {
    flex: 1,
    backgroundColor: "#f0f8ff",
  },
});

export default App;
useMap
The useMap hook returns an object containing an instance of MapViewControl and Mappedin.MapData. This hook can be used after the map has been loaded and rendered. useMap must be used in a child component of MapView. Use the MapViewControl instance to access the map's methods and properties.
function MyCustomComponent() {
    const { mapView, mapData } = useMap();

    return mapData.getByType('space').map(space => {
        return <Label target={space.center} text={space.name} />;
    });
}
useEvent
The useEvent hook enables subscribing to interactive map events and triggering a callback when they occur.
For example, the following snippet subscribes to the click event and updates state using the click coordinate. Labels are rendered based on the updated state. The click event contains all the interactive elements that the click action passed through.
See full JavaScript guides about Interactivity and the Camera for more information about events.
function MyCustomComponent() {
    const { mapView, mapData } = useMap();
    const [labels, setLabels] = useState([]);

    useEvent('click', event => {
        setLabels(prevLabels => [
            ...prevLabels,
            { target: event.coordinate, text: 'Hello, World!' },
        ]);
    });

    return labels.map((label, idx) => <Label key={idx} {...label} />);
}
Other useful events include hover, camera-change, and floor-change. Refer to the useEvent documentation for a complete list of events.
The hover event is very similar to the click event and will contain all the interactive elements that are underneath the mouse cursor.
useEvent('hover', event => {
    console.log('hover', event);
});
The camera-change event fires when the camera is adjusted. It contains the new bearing, pitch, zoomLevel and camera center coordinate.
useEvent('camera-change', event => {
    console.log('camera-change', event.bearing, event.pitch, event.zoomLevel, event.center);
});
The floor-change event fires whenever the building floor is changed. It contains the floor and the reason that the change occurred.
useEvent('floor-change', event => {
    console.log('floor-change', event.floor, event.reason);
});
Local Development
For local development, start a project using Expo. Refer to the React Native Getting Started guide for setup details. Guides are written in TypeScript (JavaScript), as the SDK is written in Typescript and uses comprehensive types.
1. Create a Project
Note that Mappedin SDK for React Native version 6 is currently in an alpha state. Therefore you must append @alpha when adding the Mappedin package. Failing to do so will add the current production release of version 5, which does not support maps in the Free, Plus, Advanced or Pro tiers.
Run these shell commands to set up a new project and install Mappedin SDK for React Native.
Create a new Expo project
The following command will create a new Expo project with a blank Typescripttemplate.
npx create-expo-app@latest my-mappedin-app --template blank-typescript
2. Install Mappedin SDK for React Native
Using NPM:
Change to the project directory and install the Mappedin SDK for React Native.
cd my-mappedin-app
npm install @mappedin/react-native-sdk@alpha
Using Yarn:
cd my-mappedin-app
yarn add @mappedin/react-native-sdk@alpha
Install Peer Dependencies
This package requires the following peer dependencies:
Using NPM:
npm install react react-native react-native-webview
Using Yarn:
yarn add react react-native react-native-webview
3. Update App.tsx
Modify & update the contents of App.tsx to match the following.
import React, { useEffect } from "react";
import { View, StyleSheet } from "react-native";
import { MapView, useMap } from "@mappedin/react-native-sdk";

const MapSetup = () => {
  const { mapData, mapView } = useMap();

  useEffect(() => {
    if (mapData && mapView) {
      console.log("Map is ready!");

      async function initializeMap() {
        // Label all spaces.
        mapView.Labels.all();
      }

      initializeMap();
    }
  }, [mapData, mapView]);

  return null;
};

// See Demo API key Terms and Conditions
// Demo Key & Maps: https://developer.mappedin.com/docs/demo-keys-and-maps
const App = () => {
  return (
    <View style={styles.container}>
      <MapView
        options={{}}
        mapData={{
          key: "mik_yeBk0Vf0nNJtpesfu560e07e5",
          secret: "mis_2g9ST8ZcSFb5R9fPnsvYhrX3RyRwPtDGbMGweCYKEq385431022",
          mapId: "660c0c3aae0596d87766f2da",
        }}
      >
        <MapSetup />
      </MapView>
    </View>
  );
};

const styles = StyleSheet.create({
  container: {
    flex: 1,
    backgroundColor: "#f0f8ff",
  },
});

export default App;
4. Run the project
Run the project using the following command. When prompted, press a to run the project on Android or i to run the project on iOS.
The 3D rendered map can be zoomed, panned and rotated via mouse or fingers.
Using NPM:
npm run start
Using Yarn:
yarn start
An example of a React Native application that showcases many features of Mappedin SDK for React Native can be found in the Mappedin React Native Github Repository.
Create a Key & Secret
A key and secret to use Mappedin Demo maps can be found on the Demo Keys & Maps Page. To use your own maps, create your own unique key and secret.
Using maps with your own key and secret requires a Pro or Enterprise Map Account.
- Log into the Mappedin Editor.
- Click on the
Developerstab. - Click
Generate API Key. - Enter a name for the key.
- Click
Generate Key. - Store the
keyandsecretis a safe and secure place.
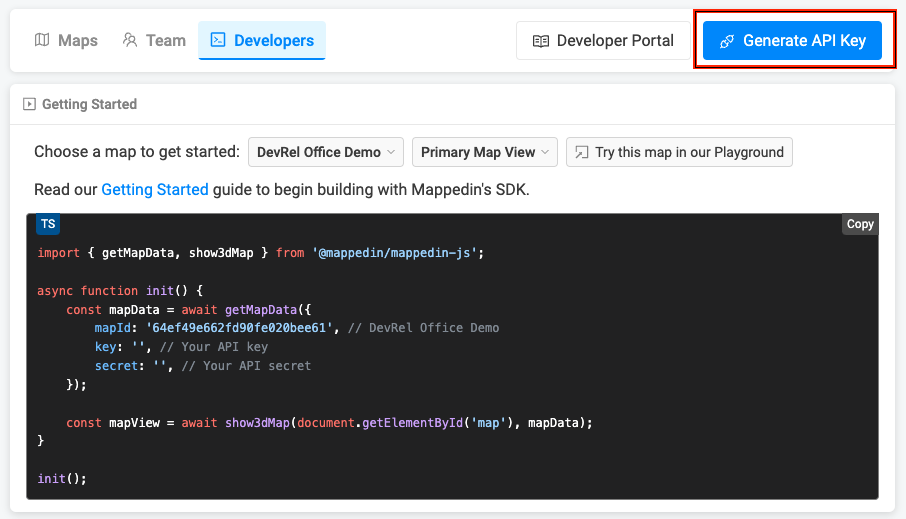
Get a Map Id
Each map has a unique identifier used by Mappedin JS to load a map. To get the mapId of a map:
- Log into the Mappedin Editor.
- Click on the
Developerstab. - Select the desired map from the dropdown.
- The
mapIdwill be shown in the code snippet.

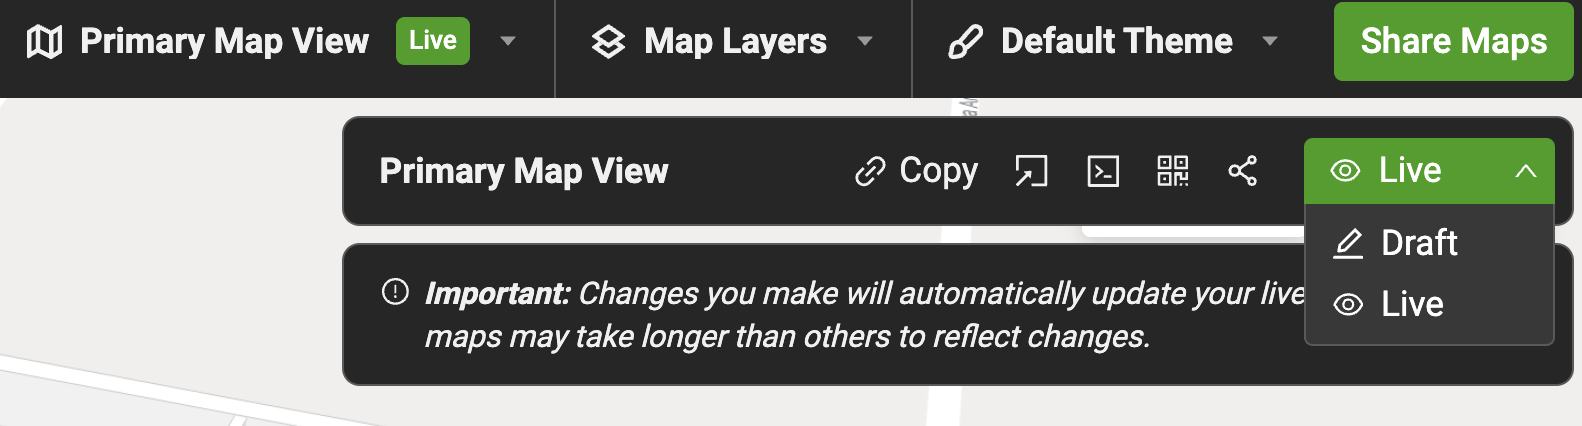
Find your Map Id from URL
- Publish your map by setting it from
DrafttoLive - Open your map
- Grab your map Id from the URL. It is located between
/map/{mapId}?floor=xyz.
Not seeing your map?
- Use of Mappedin JS requires a Pro or Enterprise Map Account. Demo API Keys will only work for Mappedin demo maps.
- Remember to set the map to Live. To do so click on the
Share Mapsbutton and changeDrafttoLive.
Authenticating with a Bearer Token
Mappedin SDK for React Native can also be authenticated with a short lived bearer token. This can be used to prevent exposing an API key and secret by generating a token on the server side. The server can securely store the API key and secret, allowing the client to use the token to authenticate with Mappedin SDK for React Native.
To do so, make a request to the API Key REST endpoint sending the API key and secret. The following TypeScript example shows how to do this using a fetch request. Additional examples can found in the API Key REST documentation.
async function getAccessToken(): Promise<string> {
    // See Trial API key Terms and Conditions
    // https://developer.mappedin.com/docs/demo-keys-and-maps
    const response = await fetch('https://app.mappedin.com/api/v1/api-key/token', {
        method: 'POST',
        headers: {
            'Content-Type': 'application/json',
        },
        body: JSON.stringify({
            key: 'YOUR_KEY',
            secret: 'YOUR_SECRET',
        }),
    });

    const data: TokenResponse = await response.json();
    return data.access_token;
}
The API Key REST endpoint will return JSON that contains the bearer token.
{
    "access_token": "…",
    "expires_in": 172800
}
The bearer token can then be used to authenticate with Mappedin JS as shown in the following example.
<MapView
  options={{}}
  mapData={{
    mapId: "your-map-id",
    accessToken: "your-access-token",
  }}
>
</MapView>
Optimizing User Interface Performance
To optimize performance and avoid unnecessary re-renders, it's important to use React's memoization techniques. Rendering a MapView can be resource-intensive, especially when dealing with complex maps that include many components. Ensure that components only re-render when necessary, and avoid patterns that trigger cascading re-renders in sub-components.
Avoid defining component properties inline—this can lead to new references on every render. Instead, define them as constants, memoized callbacks (useCallback), or memoized values (useMemo) when appropriate.
Debug Mode
Use Debug Mode to get a closer look at how various map components behave and interact. Here's how to enable it:
1. Enable Debug Mode
To activate the debug interface, call the following function in your code:
mapView.enableDebug();
MapViewControl.enableDebug displays a panel on the right side of the map, revealing several tools and controls for direct interaction with the map's elements.
2. Navigating the Debug Panel
The debug panel provides access to a variety of controls:
Geometry Controls
- Adjust individual geometry settings, such as color, opacity, visibility. These controls make it easy to see how different elements respond to changes.
Interactivity
- Use toggles to turn interactivity on/off
- Change colors and hover effects to highlight specific areas
Scene Controls
- Manage the overall scene settings, such as scaling, positioning, and group management. Toggle the visibility of groups or containers within the scene
- Adjust padding, scale, and watermark positioning
- Markers & Labels — Add, remove, or edit markers and labels directly through the panel
Camera Controls
- Fine-tune camera settings, including zoom levels, pitch, and center position
- Set minimum and maximum zoom levels
- Adjust the focus to a specific area or level
