Wayfinding
Using Mappedin SDK for iOS with your own map requires a Pro license. Try a demo map for free or refer to the Pricing page for more information.
Wayfinding is the process of navigating through environments using spatial cues and instructions to efficiently reach a destination. Mappedin SDKs provide the tools needed to guide users from one location to another. It allows drawing a path between points on the map as well as creation of textual turn-by-turn directions for navigation.
Getting Directions
Directions form the core of wayfinding. Mappedin has path finding capabilities that allow it to generate directions from one target to another. These directions are used for drawing paths and providing the user with textual turn-by-turn directions.
Generate directions by calling MapData.getDirections() and pass in targets for the origin and destination. These targets are wrapped in a NavigationTarget, which can contain various types of targets.
MapData.getDirections() can accept a single NavigationTarget or an array of them for the origin and destination. If an array is used, Mappedin will choose the targets that are closest to each other. An example of where this could be used is when a user asks for directions to a washroom. There may be many Spaces named Washroom. The app can pass all washroom spaces to getDirections and receive directions to the nearest one.
Directions for some maps may appear jagged or not smooth. This is due to the SDK attempting to find the shortest path through the map's geometry. Directions can be smoothed by setting GetDirectionsOptions.smoothing to enabled in the GetDirectionsOptions passed to MapData.getDirections(). Directions are smoothed by default for maps created using Mappedin Maker and disabled for maps created using Mappedin CMS.
Drawing Navigation
When a user needs to get from point A to point B, drawing a path on the map helps them to navigate to their destination. It can help them to visualize the route they'll need to take, like a good treasure map.
Navigation is a helper class to display wayfinding easily on the map. Functionality of Navigation could be replicated by drawing the paths using Paths and adding well designed markers at connection points.
Note that the MapView class instantiates the Navigation class and exposes it as MapView.navigation. Use MapView.navigation to utilize Navigation's methods.
Navigation.draw() allows for easily drawing multiple components that make up a wayfinding illustration. It shows a human figure to mark the start point, a path with animated directional arrows, pulses in the direction of travel and a pin to mark the destination. Each of these components can be customized to match an app's style.
The following sample uses the default navigation settings to navigate from the Cafeteria to the Gymnasium.
private func drawNavigation() {
  // Use previously generated directions.
  guard let directions = currentDirections else { return }

  let pathOptions = AddPathOptions(animateDrawing: true, color: "#4b90e2", displayArrowsOnPath: true)

  let navOptions = NavigationOptions(
    createMarkers: NavigationOptions.CreateMarkers.withCustomMarkers(
      connection: NavigationOptions.CreateMarkers.CustomMarker(
        template: getConnectionMarker(),
        options: AddMarkerOptions(interactive: .True, rank: .tier(.alwaysVisible))
      ),
      departure: NavigationOptions.CreateMarkers.CustomMarker(
        template: getDepartureMarker(),
        options: AddMarkerOptions(interactive: .True, rank: .tier(.alwaysVisible))
      ),
      destination: NavigationOptions.CreateMarkers.CustomMarker(
        template: getDestinationMarker(),
        options: AddMarkerOptions(interactive: .True, rank: .tier(.alwaysVisible))
      )
    ),
    pathOptions: pathOptions
  )

  mapView.navigation.draw(directions: directions, options: navOptions) { _ in }
}

private func getDepartureMarker() -> String {
  return """
  <svg width="48" height="48" viewBox="0 0 48 48" xmlns="http://www.w3.org/2000/svg">
    <!-- Pirate Ship -->
    <circle cx="24" cy="24" r="22" fill="#8B4513" opacity="0.2"/>
    <path d="M12 28 L12 22 L18 18 L30 18 L36 22 L36 28 L32 32 L16 32 Z" fill="#8B4513" stroke="#5D2E0F" stroke-width="2"/>
    <rect x="22" y="10" width="4" height="12" fill="#5D2E0F"/>
    <path d="M26 10 L36 14 L26 18" fill="#DC143C"/>
    <circle cx="24" cy="24" r="3" fill="#FFD700"/>
  </svg>
  """
}

private func getDestinationMarker() -> String {
  return """
  <svg width="56" height="56" viewBox="0 0 56 56" xmlns="http://www.w3.org/2000/svg">
    <!-- Background glow -->
    <circle cx="28" cy="28" r="26" fill="#FFD700" opacity="0.2"/>

    <!-- Treasure chest body -->
    <rect x="14" y="24" width="28" height="18" rx="2" fill="#8B4513" stroke="#5D2E0F" stroke-width="2"/>

    <!-- Chest lid -->
    <path d="M 14 24 Q 14 18 20 16 L 36 16 Q 42 18 42 24" fill="#6D3913" stroke="#5D2E0F" stroke-width="2"/>

    <!-- Lid highlight -->
    <path d="M 16 24 Q 16 20 20 18 L 36 18 Q 40 20 40 24" fill="#8B4513"/>

    <!-- Front band -->
    <rect x="14" y="24" width="28" height="5" fill="#5D2E0F"/>

    <!-- Center lock plate -->
    <rect x="26" y="24" width="4" height="18" fill="#5D2E0F"/>

    <!-- Lock -->
    <circle cx="28" cy="33" r="3" fill="#DAA520" stroke="#8B6914" stroke-width="1"/>
    <circle cx="28" cy="33" r="1.5" fill="#5D2E0F"/>

    <!-- Gold coins spilling out -->
    <circle cx="20" cy="30" r="2.5" fill="#FFD700" stroke="#DAA520" stroke-width="1"/>
    <circle cx="36" cy="30" r="2.5" fill="#FFD700" stroke="#DAA520" stroke-width="1"/>
    <circle cx="18" cy="36" r="2" fill="#FFD700" stroke="#DAA520" stroke-width="1"/>
    <circle cx="38" cy="36" r="2" fill="#FFD700" stroke="#DAA520" stroke-width="1"/>
    <circle cx="24" cy="38" r="2" fill="#FFD700" stroke="#DAA520" stroke-width="1"/>
    <circle cx="32" cy="38" r="2" fill="#FFD700" stroke="#DAA520" stroke-width="1"/>
  </svg>
  """
}

private func getConnectionMarker() -> String {
  return """
  <svg width="40" height="40" viewBox="0 0 40 40" xmlns="http://www.w3.org/2000/svg">
    <!-- Compass -->
    <circle cx="20" cy="20" r="18" fill="#2C3E50" opacity="0.2"/>
    <circle cx="20" cy="20" r="14" fill="#34495E" stroke="#95A5A6" stroke-width="2"/>
    <circle cx="20" cy="20" r="10" fill="#2C3E50"/>
    <path d="M20 12 L23 20 L20 22 L17 20 Z" fill="#DC143C"/>
    <path d="M20 28 L23 20 L20 18 L17 20 Z" fill="#ECF0F1"/>
    <circle cx="20" cy="20" r="2" fill="#FFD700"/>
  </svg>
  """
}
Highlighting a Portion of a Path
The path drawn by Navigation or Paths can have a portion highlighted to draw attention to it. This could be used to show the progress of a user's journey. To highlight a portion of the path, use the Navigation.highlightPathSection or Paths.highlightSection methods.
The following code demonstrates how to highlight a portion of a path, starting from the origin of directions and ending at a given coordinate. Note that the floor must be provided when using a coordinate to highlight a path section.
let coordinate = mapView.createCoordinate(
    latitude: Double(position.latitude),
    longitude: Double(position.longitude),
    floorId: position.floorOrFloorId
)

if let firstCoordinate = directions?.coordinates.first {
    // Highlight the traveled path.
    mapView.Navigation.highlightPathSection(
        from: firstCoordinate,
        to: coordinate,
        options: [
            "animationDuration": 0,
            "color": "#9d9d9d",
            "widthMultiplier": 1.1
        ]
    )
}
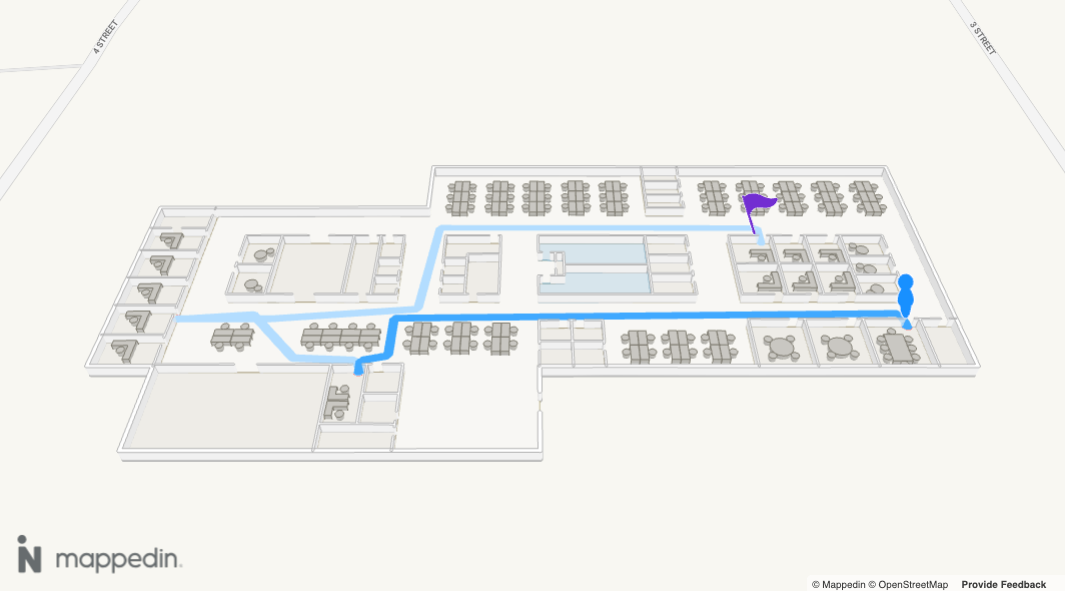
Illustrating Navigation Progress
When a user's position is available and a Blue Dot is shown, the drawn path can be kept in sync with where the user actually is. Navigation.trackCoordinate() takes the user's current Coordinate and updates the active path to reflect their progress. It is typically called on every position update, such as inside the Blue Dot's dotPositionUpdate event handler.
Navigation.trackCoordinate() supports two modes, supplied through TrackCoordinateOptions. Only one mode can be active at a time, and switching modes clears the previous mode's visual state. Use Navigation.stopTracking() to remove all tracking state.
A complete example demonstrating both tethered and travelled tracking modes can be found in the Mappedin iOS GitHub repo: BlueDotPathTetheringDemoViewController.swift
Tethered Mode
Tethered mode anchors the path to the user's position so the directional path always begins at or near them. As the user moves, the portion of the path behind them is removed. The tetherThresholdDistance sets how far (in meters) the user can stray from the path before they are considered off-route. When the user is outside that threshold, CoordinateOutsideThresholdMode controls the behaviour and OutsideThresholdPathStyle controls how the dashed connector back to the path is drawn. These are set using TetheredOptions.
mapView.blueDot.on(BlueDotEvents.dotPositionUpdate) { [weak self] payload in
    guard let self, let payload else { return }

    // Snap the user's position onto the closest point on the active path.
    let options: TrackCoordinateOptions = .tethered(TetheredOptions(
        tetherThresholdDistance: 10,
        outsideThresholdPathStyle: .dashedBoxes,
        coordinateOutsideThresholdMode: .tetherAndDash
    ))
    self.mapView.navigation.trackCoordinate(coordinate: payload.position, options: options) { _ in }
}
Travelled Mode
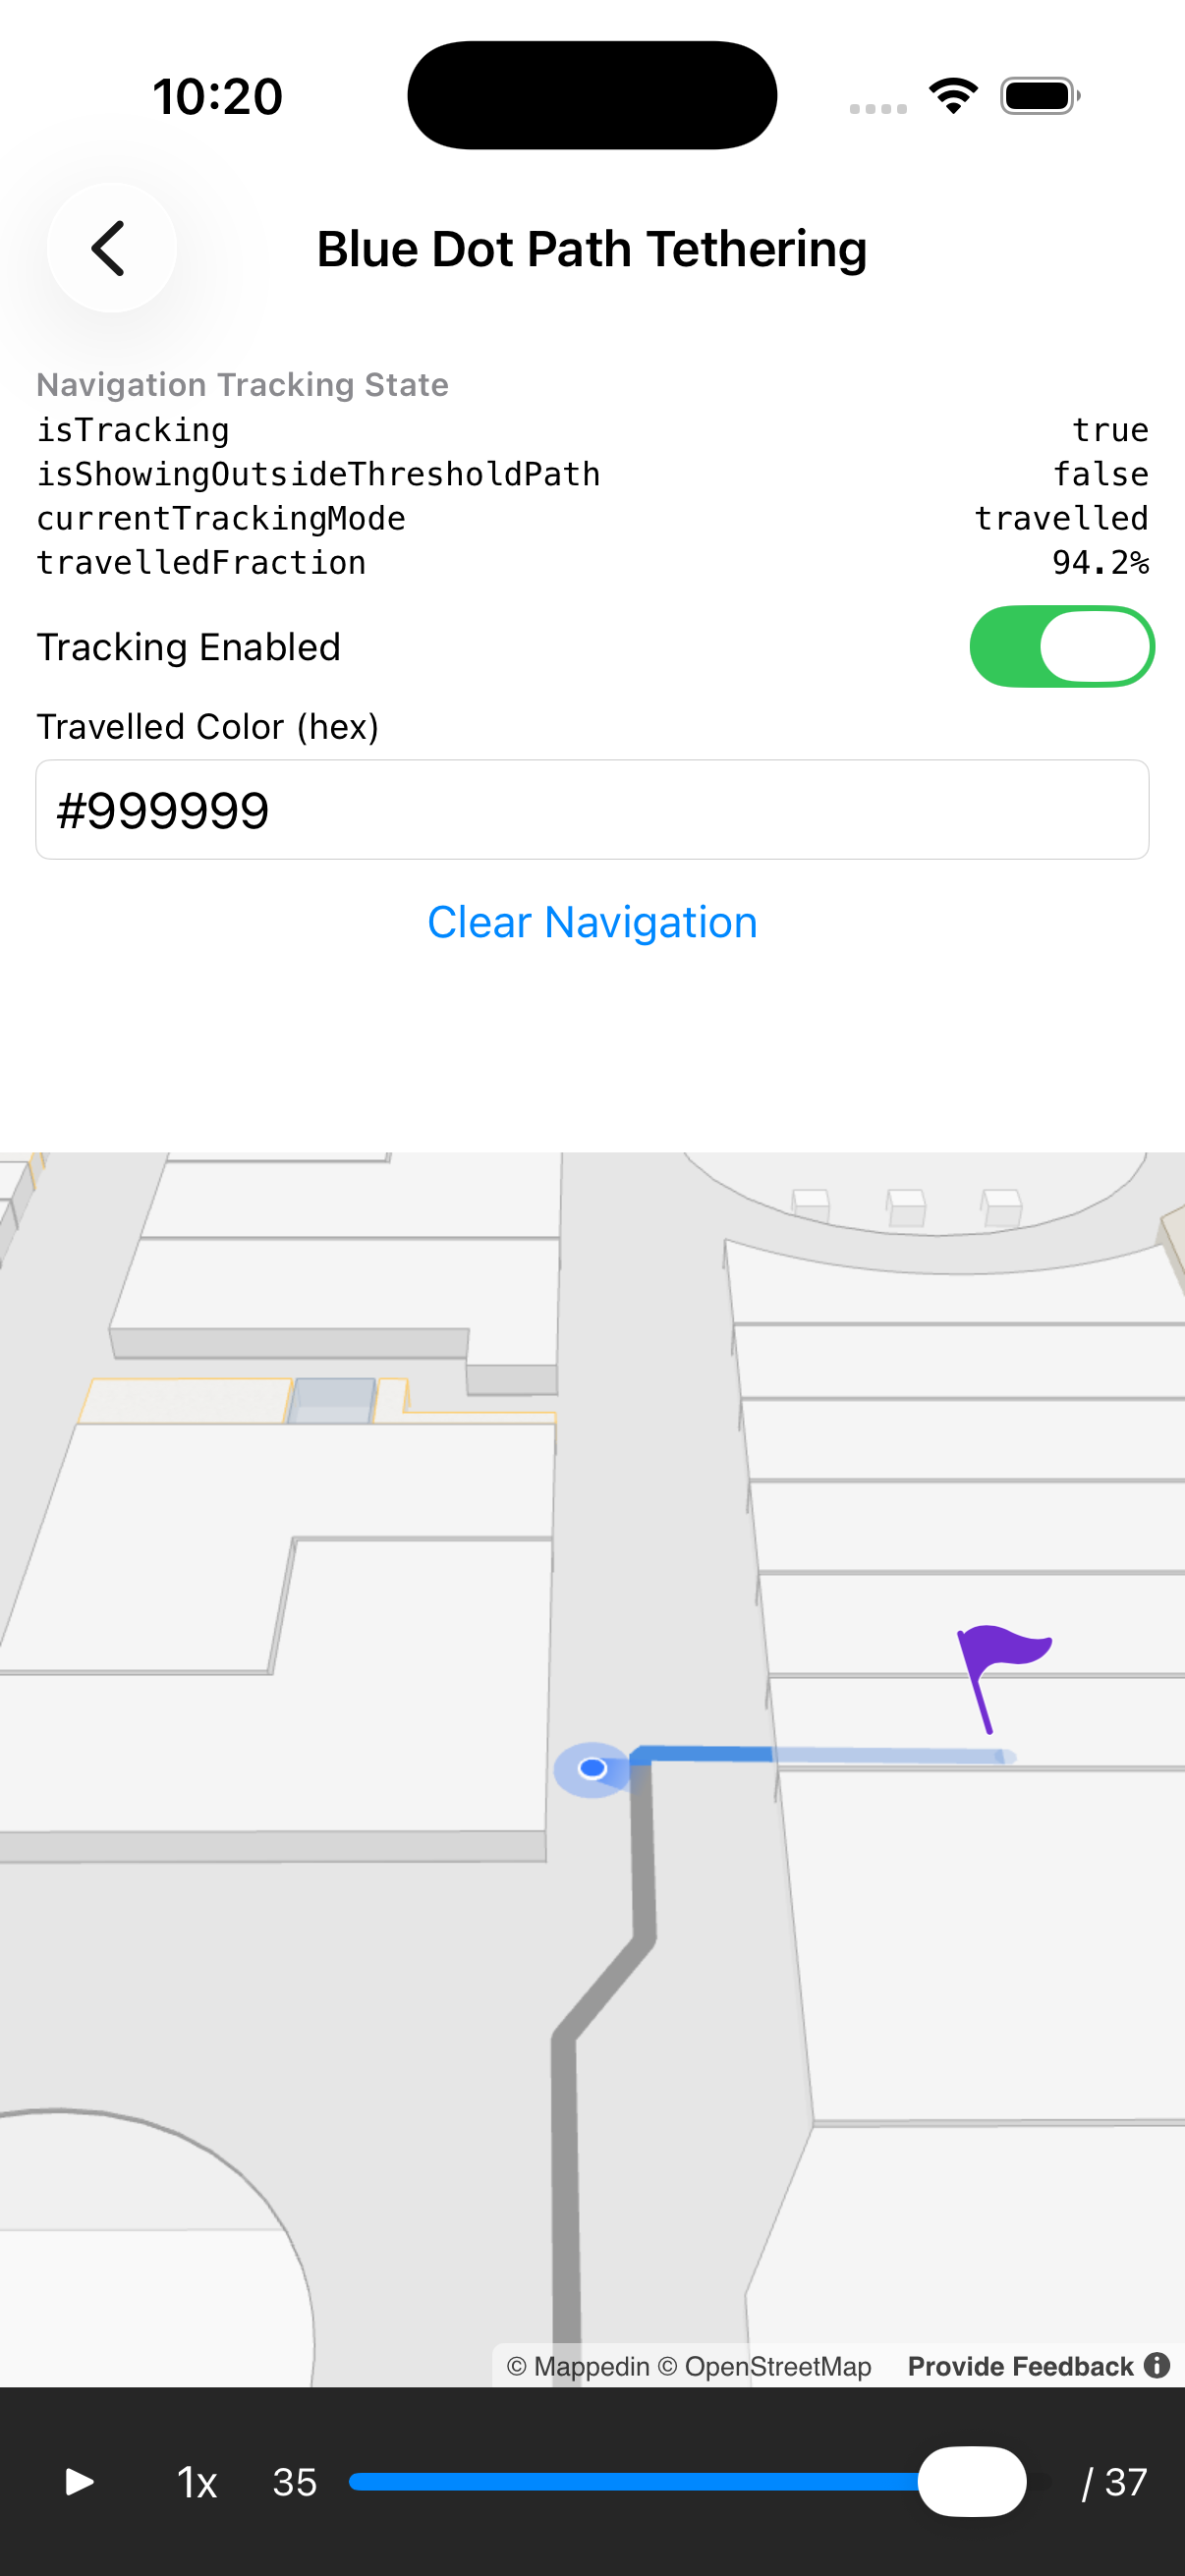
Travelled mode keeps the full start-to-end path visible and recolours the portion the user has already walked past to show their progress. The color option of TravelledOptions sets the colour used for the travelled portion. Navigation.travelledFraction reports how far along the path the user has travelled as a value from 0 to 1.
mapView.blueDot.on(BlueDotEvents.dotPositionUpdate) { [weak self] payload in
    guard let self, let payload else { return }

    // Recolour the portion of the path the user has walked past.
    let options: TrackCoordinateOptions = .travelled(TravelledOptions(color: "#999999"))
    self.mapView.navigation.trackCoordinate(coordinate: payload.position, options: options) { _ in }
}
Navigating From a Click Event
A navigation start or end point may originate from a user clicking on the map. It is possible to create a start and or end point using the click event and accessing its Events payload.
A complete example demonstrating Navigation from a click event can be found in the Mappedin iOS GitHub repo: PathsDemoViewController.swift
The code shown below uses the first click position as a start point and the second click position as an end point to create directions between them.
// Set all spaces to be interactive initially
mapView.mapData.getByType(.space) { (result: Result<[Space], Error>) in
    if case .success(let spaces) = result {
        print("PathsDemo: Found \(spaces.count) spaces")

        for space in spaces {
            self.mapView.updateState(space: space, state: GeometryUpdateState(interactive: true))
        }

        // Handle click events
        self.mapView.on(Events.click) { [weak self] clickPayload in
            guard let self = self, let clickPayload = clickPayload else { return }

            let spaces = clickPayload.spaces
            if spaces == nil || spaces?.isEmpty == true {
                // Click on non-space area when path exists - reset
                if self.path != nil {
                    self.mapView.paths.removeAll()
                    self.startSpace = nil
                    self.path = nil
                    self.setSpacesInteractive(interactive: true)
                    self.instructionLabel.text = "1. Click on a space to select it as the starting point."
                }
                return
            }

            guard let clickedSpace = spaces?.first else { return }

            if self.startSpace == nil {
                // Step 1: Select starting space
                self.startSpace = clickedSpace
                self.instructionLabel.text = "2. Click on another space to select it as the end point."
            } else if self.path == nil {
                // Step 2: Select ending space and create path
                guard let start = self.startSpace else { return }
                self.mapView.mapData.getDirections(
                    from: .space(start),
                    to: .space(clickedSpace)
                ) { result in
                    if case .success(let directions) = result, let directions = directions {
                        let opts = AddPathOptions(color: "#1871fb", width: .value(1.0))
                        self.mapView.paths.add(coordinates: directions.coordinates, options: opts) { pathResult in
                            if case .success(let createdPath) = pathResult {
                                self.path = createdPath
                                self.setSpacesInteractive(interactive: false)
                                self.instructionLabel.text = "3. Click anywhere to remove the path."
                            }
                        }
                    }
                }
            } else {
                // Step 3: Remove path and reset
                self.mapView.paths.removeAll()
                self.startSpace = nil
                self.path = nil
                self.setSpacesInteractive(interactive: true)
                self.instructionLabel.text = "1. Click on a space to select it as the starting point."
            }
        }
    }
}
Multi-Floor Wayfinding
Using Navigation, no additional work is needed to provide wayfinding between floors. Whenever a user needs to switch a floor, an interactive tooltip with an icon indicating the type of Connection (such as an elevator or stairs) will be drawn. By clicking or tapping the tooltip, the map view switches to the destination floor.
Multi-Destination Wayfinding
Multi-segment directions are directions that include multiple legs. They can be created by passing an array of destinations to MapData.getDirectionsMultiDestination().
let start = // ... get entrance space
let destinations: [Any] = [
    NavigationTarget.space(store1),
    NavigationTarget.space(store2),
    NavigationTarget.space(restaurant)
]


mapData.getDirectionsMultiDestination(
    from: .space(start),
    to: destinations
) { result in
    switch result {
    case .success(let allDirections):
        allDirections?.enumerated().forEach { index, directions in
            print("Route \(index + 1): \(directions.distance)m")
        }
    case .failure(let error):
        print("Error: \(error)")
    }
}
Wayfinding Using Accessible Routes
When requesting directions, it is important to consider the needs of the user. Users with mobility restrictions may require a route that avoids stairs and escalators and instead uses ramps or elevators.
The getDirections method accepts GetDirectionsOptions, which allows specifying whether an accessible route should be returned. By default, the shortest available route is chosen. The following code demonstrates how to request directions that make use of accessible routes.
mapData.getDirections(
    from: .space(space1),
    to: .space(space2),
    options: GetDirectionsOptions(accessible: true)
) { result in
    switch result {
    case .success(let directions):
        // Use directions
    case .failure(let error):
        print("Error: \(error)")
    }
}
Drawing a Path
A complete example demonstrating drawing a path can be found in the Mappedin iOS GitHub repo: PathsDemoViewController.swift
While Navigation provides a complete start and end navigation illustration, it may be desired to draw just the path. This can be done using Paths.
Note that the MapView class implements the Paths interface and exposes it as MapView.paths. Use MapView.paths to utilize Paths methods.
Paths can be drawn from one coordinate to another using Paths.add(). If using just two coordinates, the path will be drawn straight between the two points. This may work for some scenarios, but in most cases an app will need to show the user their walking path, going through doors and avoiding walls and other objects. Such a path of coordinates can be created by calling the MapData.getDirections() method, passing in a start and end NavigationTarget. Note that a Space requires an entrance to be used as a target.
The width of the path is set using the width parameter. This value is in meters. Additional path styles are outlined later in this guide in the Path Styles section.
self.mapView.mapData.getDirections(
    from: .space(start),
    to: .space(end)
) { result in
    if case .success(let directions) = result, let directions = directions {
        let opts = AddPathOptions(color: "#1871fb", width: .value(1.0))
        self.mapView.paths.add(coordinates: directions.coordinates, options: opts) { pathResult in
            if case .success(let createdPath) = pathResult {
                // Store the path for later use.
                self.path = createdPath
            }
        }
    }
}
Removing Paths
There are two methods that can be used to remove paths. Paths.remove() accepts a path to remove and is used to remove a single path. To remove all paths, Paths.removeAll() can be used.
// Remove a single path.
mapView.paths.remove(path);
// Remove all paths
mapView.paths.removeAll();
Path Styles
Mappedin SDKs offer many options to customise how paths appear to the user. Path animations, color, width and many more options can be set using AddPathOptions.
Dynamic Routing
When generating directions, Mappedin SDKs provide the most direct route possible between the origin and destination. There can be scenarios when this is not desired, such as when there there is an obstruction like a spill that requires cleaning or where maintenance crews are active.
A complete example demonstrating dynamic routing can be found in the Mappedin iOS GitHub repo: AreaShapesDemoViewController.swift
The MapData.getDirections() method accepts a zones parameter that denotes areas that could be avoided. Zones are defined using DirectionZone and contain a cost, floor and geometry.
cost represents the additional cost for navigation through the zone and can range from from 0 to Infinity. A cost of 0 will make the zone free to navigate through. A zone cost of Infinity will block passage through the zone. Multiple zones occupying the same location they are added together, along with the cost from the map. The SDK may route directions through a zone if all other routes have a higher cost.
floor represents the floor for the zone. If not specified the zone blocks all floors.
geometry is held within a Feature that contains a Geometry object.
Turn-by-Turn Directions
Turn-by-Turn directions are a set of text instructions describing the route the user needs to take. An example is "Turn right and go 10 meters". These could be shown to the user in a list to give them an overview with all steps they need to take, or the current instruction could be displayed along with a map showing the next leg of their journey.
A complete example demonstrating turn-by-turn directions can be found in the Mappedin iOS GitHub repo: TurnByTurnDemoViewController.swift
The code sample assembles these actions together and:
- Gets directions between the start and end NavigationTarget.
- Draws a path using the directions' coordinates.
- Creates a Marker with textual turn-by-turn instructions for each leg in the journey. Refer to the Marker Guide for more information on using Markers.
private var currentDirections: Directions?

private func onMapReady() {
    // Add labels to all named spaces
    mapView.mapData.getByType(.space) { [weak self] (spacesResult: Result<[Space], Error>) in
        guard let self = self else { return }
        if case .success(let spaces) = spacesResult {
            spaces.forEach { space in
                if !space.name.isEmpty {
                    self.mapView.labels.add(
                        target: space,
                        text: space.name,
                        options: AddLabelOptions(interactive: true)
                    ) { _ in }
                }
            }

            // Find destination space
            let destination = spaces.first { $0.name == "Family Med Lab EN-09" }

            // Get origin object
            self.mapView.mapData.getByType(.mapObject) { [weak self] (objResult: Result<[MapObject], Error>) in
                guard let self = self else { return }
                if case .success(let objects) = objResult {
                    let origin = objects.first { $0.name == "Lobby" }

                    if let origin = origin, let destination = destination {
                        self.getAndDisplayDirections(origin: origin, destination: destination)
                    }
                }
            }
        }
    }
}

private func getAndDisplayDirections(origin: MapObject, destination: Space) {
    mapView.mapData.getDirections(
        from: .mapObject(origin),
        to: .space(destination)
    ) { [weak self] result in
        guard let self = self else { return }
        if case .success(let directions) = result, let directions = directions {
            self.currentDirections = directions

            // Focus on the first 3 steps in the journey
            let focusCoordinates = Array(directions.coordinates.prefix(3)).map { FocusTarget.coordinate($0) }

            let focusOptions = FocusOnOptions(
                screenOffsets: InsetPadding(
                    bottom: 50,
                    left: 50,
                    right: 50,
                    top: 50
                )
            )

            self.mapView.camera.focusOn(targets: focusCoordinates, options: focusOptions)

            // Add markers for each direction instruction
            self.addInstructionMarkers(directions: directions)

            // Draw navigation by default
            self.drawNavigation()
        }
    }
}

private func addInstructionMarkers(directions: Directions) {
    let instructions = directions.instructions

    for i in 0..<instructions.count {
        let instruction = instructions[i]
        let nextInstruction = i < instructions.count - 1 ? instructions[i + 1] : nil
        let isLastInstruction = i == instructions.count - 1

        let markerText: String
        if isLastInstruction {
            markerText = "You Arrived!"
        } else {
            let actionType = instruction.action.type
            let bearing = instruction.action.bearing?.rawValue ?? ""
            let distance = Int((nextInstruction?.distance ?? 0).rounded())
            markerText = "\(actionType) \(bearing) and go \(distance) meters"
        }

        let markerTemplate = """
        <div style="
            background: white;
            padding: 8px 12px;
            border-radius: 8px;
            box-shadow: 0 2px 8px rgba(0,0,0,0.15);
            font-family: -apple-system, BlinkMacSystemFont, sans-serif;
            font-size: 12px;
            white-space: nowrap;
        ">
            <p style="margin: 0;">\(markerText)</p>
        </div>
        """

        mapView.markers.add(
            target: instruction.coordinate,
            html: markerTemplate,
            options: AddMarkerOptions(rank: .tier(.alwaysVisible))
        ) { _ in }
    }
}

private func drawNavigation() {
    guard let directions = currentDirections else { return }
    mapView.navigation.draw(directions: directions) { _ in }
}