Getting Started
Using Mappedin SDK for iOS with your own map requires an Enterprise license. Try a demo map for free or refer to the Pricing page for more information.
Mappedin SDK for iOS helps you deliver the rich indoor mapping experience of your venue, designed in Mappedin CMS, inside your iOS apps.
In this overview, we will go through the basic concepts that will help you understand how the SDK works. In further sections, we'll also go through the setup and usage of the Mappedin SDK for iOS.
The Mappedin SDK for iOS is a native interface to Mappedin JS. The SDK is a framework built using Swift, and it automatically handles any authentication, network communication, fetching of map data, its display, and basic user interaction, such as panning, tapping, and zooming. The SDK allows you to build your own interactions. You can render your own additional layers on top of the map that the SDK renders.
Mappedin SDK for iOS is supported on iOS versions 14.0 and above
Concepts
- After the quick initial setup and configuration, the SDK renders the maps associated with the keys provided by you, inside an MPIMapView instance you created.
- The SDK allows you to render your venue's maps in 3D. The SDK pulls the most up-to-date data from our mapping CMS for all your points of interest within your venue.
- The SDK supports drawing navigation paths and providing instructions to and from any point of interest within the venue. Both accessible and non-accessible optimized routes are supported. You can build more functionality on top of this experience, such as searching or switching venues.
Further pieces of this guide give you more details about how to set up the SDK and customize it as per your liking.
Coding with AI
Mappedin SDK for iOS provides an llms-mappedin-ios.txt file that can be used to help with coding when using Large Language Models (LLMs).
Expand for instructions on how to use Mappedin provided llms.txt files with Cursor, Github Copilot, JetBrains AI Assistant and Windsurf.
How to use llms.txt files with LLMs:
- Cursor
- Github Copilot
- JetBrains AI Assistant
- Windsurf
To use the llms.txt file with Cursor:
- Download the
llms.txtfile for this guide. - Create a
.cursordirectory in your project root if it doesn't exist already. - Place the
llms.txtfile in the.cursordirectory. - Start creating a new Cursor rule using Cursor's instructions.
- Set the rule type to:
Agent Requested. - Set the agent description to:
Use this rule whenever a question is asked about Mappedin, Mappedin-JS, Mappedin SDK.. - In the rule body, add the name of the llms.txt file such as:
@llms.txtor@llms-mappedin-js.txt - Optionally, if using Mappedin JS add :
@index.d.ts, referring to theindex.d.tsfile located in thenode_modules/@mappedin/mappedin-js/lib/esm/directory to add all Mappedin types to the rule. - With this configuration, Cursor will automatically use the
llms.txtwhenever a question is asked aboutMappedin,Mappedin-JSorMappedin SDKs. When starting a new chat be sure to mentionMappedinto trigger the rule. - The
llms.txtfile includes:- Detailed explanations of concepts
- Code examples and their context
- Related documentation references
- Source file locations for verification
This helps ensure that Cursor provides assistance that is consistent with Mappedin documentation and best practices, using the same structured information that's available on the Mappedin Developer Portal.
To use the llms.txt file with GitHub Copilot Chat in VS Code:
- Download the
llms.txtfile for this guide. - Create a
.copilotdirectory in your project root if it doesn't exist already. - Place the
llms.txtfile in the.copilotdirectory. - When using Copilot Chat, you can reference the file by saying "Please use the context from the llms.txt file in the .copilot directory".
- The
llms.txtfile includes:- Detailed explanations of concepts
- Code examples and their context
- Related documentation references
- Source file locations for verification
This helps ensure that Copilot provides assistance that is consistent with documentation and best practices, using the same structured information that's available on the Mappedin Developer Portal.
To use the llms.txt file with JetBrains AI Assistant:
- Download the
llms.txtfile for this guide. - Create a
.idea/aidirectory in your project root if it doesn't exist already. - Place the
llms.txtfile in the.idea/aidirectory. - When using the AI Assistant, you can reference the file by saying "Please use the context from the llms.txt file in the .idea/ai directory".
- The
llms.txtfile includes:- Detailed explanations of concepts
- Code examples and their context
- Related documentation references
- Source file locations for verification
This helps ensure that the AI Assistant provides assistance that is consistent with documentation and best practices, using the same structured information that's available on the Mappedin Developer Portal.
To use the llms.txt file with Windsurf in VS Code:
- Download the
llms.txtfile for this guide. - Create a
.windsurfdirectory in your project root if it doesn't exist already. - Place the
llms.txtfile in the.windsurfdirectory. - When using Windsurf Chat, you can reference the file by saying "Please use the context from the llms.txt file in the .windsurf directory".
- The
llms.txtfile includes:- Detailed explanations of concepts
- Code examples and their context
- Related documentation references
- Source file locations for verification
This helps ensure that Windsurf provides assistance that is consistent with documentation and best practices, using the same structured information that's available on the Mappedin Developer Portal.
Quickstart
This quickstart guide is written for a new Storyboard application that has been initialized with Cocoapods.
Add dependency to CocoaPods
Mappedin's SDK is available through CocoaPods. You can find the latest version on Github. To install it, add the dependency to your Podfile in your project's root directory:
pod 'MappedIn', '5.8.2'
For more information on how to use Cocoapods, see here.
In order for your project to recognize the Pods framework, you must be working from the .xcworkspace file rather than the individual .xcproj file. If you started a new project from scratch in Xcode, you'll need to close it and open the workspace.
Make sure platform :ios, '11.0' is set to version 11.0 at minimum.
Your Podfile should now have at least the following information with your own app name replacing mappedin-ios-sdk-app:
platform :ios, '11.0'

target 'mappedin-ios-sdk-app' do
  use_frameworks!

  pod 'MappedIn', '5.0.3'
end
In the terminal, run pod install in your project's root directory.
To import the module into the project, add the following line to your ViewController:
import Mappedin
Refer to our Github repository to view the sample app created by Mappedin developers to understand how to embed a map into your app.
Display the Venue
Creating the MPIMapView instance
Now we are ready to initialize an MPIMapView instance mapView in the viewDidLoad() method of your ViewController and add it to the layout:
var mapView: MPIMapView?

override func viewDidLoad() {
    super.viewDidLoad()

    // Set up MPIMapView and add to view
    mapView = MPIMapView(frame: view.frame)
    if let mapView = mapView {
            self.view.addSubview(mapView)
    }
}
Load the Venue
loadVenue is a MPIMapView function that allows you to render the venue in your app by passing in an options object and an optional showVenueOptions object.
The required properties of options object are venue, clientId, clientSecret. To get you started, we’ve provided a Mappedin id and secret that has access to some demo venues. When you’re ready to start using your own venues with the SDK, you will need to contact a Mappedin representative to get your own unique id and secret.
| Property | Value |
|---|---|
venue | mappedin-demo-mall |
clientId | See Here |
clientSecret | See Here |
You can also pass in MPIOptions.ShowVenue to modify the properties of the map such as the background color, the map that is displayed first and whether all locations are labeled on initialization. Add the following mapView.loadVenue call inside the optional unwrapping of mapView.
mapView.loadVenue(options:
    MPIOptions.Init(
        clientId: "5eab30aa91b055001a68e996",
        clientSecret: "RJyRXKcryCMy4erZqqCbuB1NbR66QTGNXVE0x3Pg6oCIlUR1",
        venue: "mappedin-demo-mall"),
    showVenueOptions: MPIOptions.ShowVenue(
        labelAllLocationsOnInit: true,
        backgroundColor: "#ffffff"
))
To display the data in an alternative language present in the Mappedin system, you can request the data with custom headers:
  MPIOptions.Init(
        clientId: "5eab30aa91b055001a68e996",
        clientSecret: "RJyRXKcryCMy4erZqqCbuB1NbR66QTGNXVE0x3Pg6oCIlUR1",
        venue: "mappedin-demo-mall",
        headers: [MPIHeader(name: "Accept-Language", value: "en")]
  )
Showing cached venue data
showVenue is an alternative method to load the venue without using any API calls to retrieve the data. Instead, the data must be passed into the showVenue method which takes in a data string (which can be retrieved from a file).
Use this sample JSON file to get started with the
showVenuemethod.
Here is an example:
// use showVenue to load venue
if let path = Bundle.main.path(forResource: "mappedin-demo-mall", ofType: "json") {
    venueDataString = try? String(contentsOfFile: path)
    if let venueDataString = venueDataString {
        mapView.showVenue(
            venueResponse: venueDataString,
            showVenueOptions: MPIOptions.ShowVenue(labelAllLocationsOnInit: true,
            backgroundColor: "#CDCDCD")
        )
    }
}
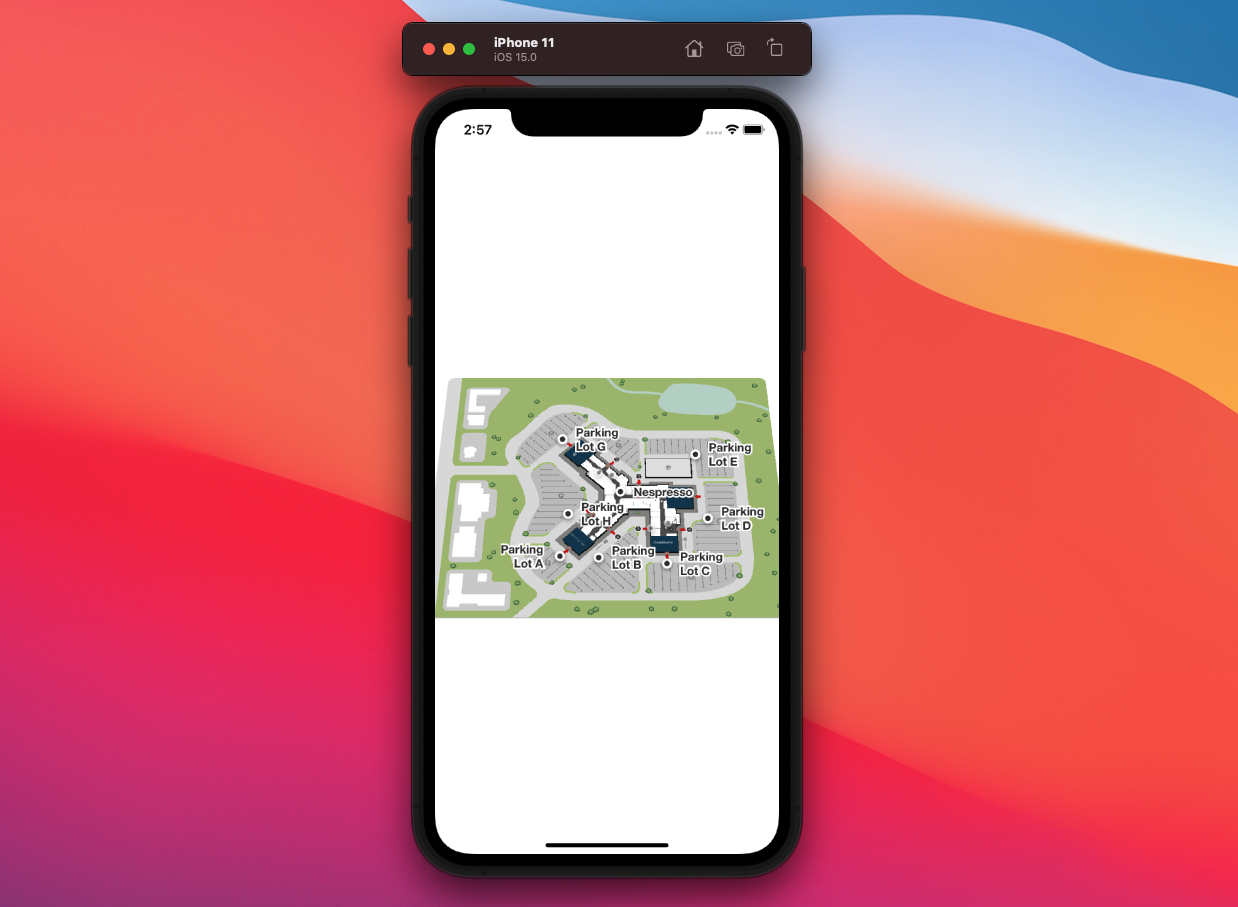
Result
import UIKit
import Mappedin

class ViewController: UIViewController {

    var mapView: MPIMapView?

    override func viewDidLoad() {
        super.viewDidLoad()

        mapView = MPIMapView(frame: view.frame)
        if let mapView = mapView {
            self.view.addSubview(mapView)

            mapView.loadVenue(options:
                MPIOptions.Init(
                    clientId: "5eab30aa91b055001a68e996",
                    clientSecret: "RJyRXKcryCMy4erZqqCbuB1NbR66QTGNXVE0x3Pg6oCIlUR1",
                    venue: "mappedin-demo-mall"),
                showVenueOptions: MPIOptions.ShowVenue(
                    labelAllLocationsOnInit: true,
                    backgroundColor: "#ffffff"
            ))
        }
    }
}
You should see something that looks like this: