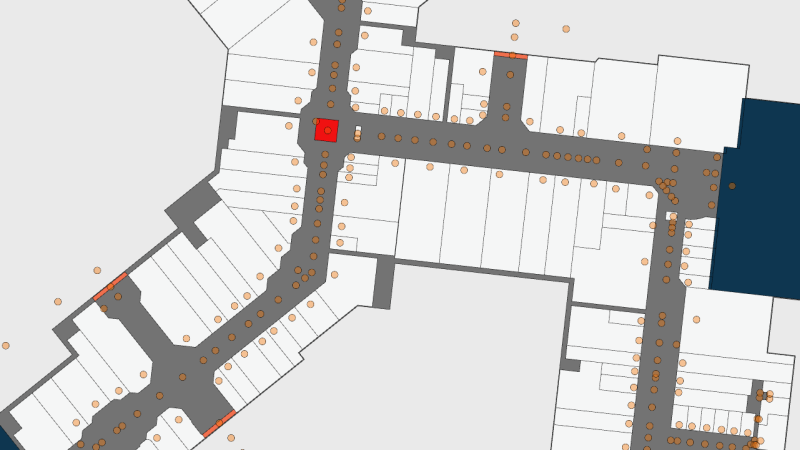
deck.gl is a popular open source framework for rendering maps and data with WebGL. In this guide, we'll demonstrate using Mappedin Venue Format (MVF) data to render the Mappedin Demo Mall with deck.gl layers.
Setup
Although we recommend and use TypeScript in this guide, with small modifications you can adjust the code snippets to work with JavaScript as well.
- Start a new vanilla Vite TypeScript project with
yarn create vite mappedin-deckgl- Select Vanilla and TypeScript
- Then run
cd mappedin-deckgl && yarn yarn devto start run the project. This will display a Vite welcome page
- Download the MVF sample package
- Extract the contents of
MVF_Demo_Filesfolder to/public/data/in the project folder - Add deck.gl, community deck.gl types and GeoJSON types. To avoid adding React as a dependency, we'll import only the necessary the deck.gl submodules.
yarn add @deck.gl/core @deck.gl/layers @danmarshall/deckgl-typings @types/geojsonWe're ready to begin writing. Start by clearing src/main.ts and add the following imports.
import { Deck } from "@deck.gl/core";import { GeoJsonLayer } from "@deck.gl/layers";import { RGBAColor } from "deck.gl";import { Feature, FeatureCollection } from "geojson";Loading MVF Data
The manifest.geojson file in the MVF folder defines the structure and other files in the bundle. The MVF Data Model talks more about these files and their properties in detail. Right now we need only "Level", "Space" and "Node".
Create a simple fetch helper to load GeoJSON data from the public folder. Parse the venue slug, data type, and level id to create the path to the file.
async function loadData( venue: string, type: string, id: string): Promise<FeatureCollection> { return (await fetch(`/data/${venue}/${type}/${id}.geojson`)).json();}The Mappedin Demo Mall features three levels and most of the data is divided into three files named after the level id. We can find the level id of "Lower Level" by looking at the properties of the level files and selecting the correct file name.
For the purposes of this quick guide, we'll hardcode the slug and level id. Begin by fetching the data we need with these values using the loadData function we wrote earlier.
const slug = "mappedin-demo-mall";const levelId = "5835ab589321170c11000000";
const levelData = await loadData(slug, "level", levelId);const spacesData = await loadData(slug, "space", levelId);const nodeData = await loadData(slug, "node", levelId);We now have three GeoJSON FeatureCollections representing the traversable areas and the nodes within our map. Next, we'll create our deck.gl layers.
Creating Layers
Let's transform the MVF data we just loaded into layers for deck.gl to render. To do this, we'll start by using deck.gl's GeoJsonLayer class. Create a new GeoJsonLayer for levels and give it the id "level-layer". Feed the levelData.features from MVF in as the data. Since this layer represents the background traversable area of the building floor, style it with a grey fill color and thin line width.
const levelLayer = new GeoJsonLayer({ id: "level-layer", data: levelData.features, getFillColor: [119, 119, 119, 255], getLineWidth: 0.1,});Our spaces layer represents the "rooms" in the venue, which are often assigned with a hex color code. Since deck.gl expects an RGB array for colors, write another short helper to convert our hexadecimal codes to RGB.
function hexToRGB(hex: string): RGBAColor { return hex.match(/[0-9a-f]{2}/g)!.map((x) => parseInt(x, 16)) as RGBAColor;}Now we can proceed in creating the "spaces-layer". It will take spacesData.features as the data and filtered for only "Polygon" geometry type. For the fill color, we'll access the color stored within each Feature object's properties. Use our newly created hexToRGB() to convert the color to RGB or fallback to white.
const spacesLayer = new GeoJsonLayer({ id: "spaces-layer", data: spacesData.features.filter((f) => f.geometry.type === "Polygon"), getFillColor: (feature) => { return ( hexToRGB((feature as Feature).properties!.color) || [255, 255, 255, 255] ); }, getLineWidth: 0.1,});Last, we'll create the layer for nodes. The "node-layer" takes the nodeData.features and an orange fill color with 40% opacity.
const nodeLayer = new GeoJsonLayer({ id: "node-layer", data: nodeData.features, getFillColor: [255, 120, 0, 102], getLineWidth: 0.1,});Rendering the Map
Finally, we can initialize a new Deck object to render our layers on screen. Set the initialViewState to the approximate latitude and longitude for the Mappedin Demo Mall and enable the controller for interactivity. Then, add our three layers to the map in the order in which they are drawn.
new Deck({ initialViewState: { latitude: 43.52014270934553, longitude: -80.53550722882292, zoom: 16, }, controller: true, layers: [levelLayer, spacesLayer, nodeLayer],});The final product can be seen in the CodeSandbox below and demonstrates a good starting point for working with MVF and deck.gl. The orange dots represent the nodes which can be used for pathfinding through the venue. You can find more information about GeoJSON data available in the MVF package on the MVF Data Model page.